# DealerAI Documentation (/docs)
Welcome to the DealerAI documentation. This site covers every section of the DealerAI management
portal and how to use it effectively.
Where to Start [#where-to-start]
What is DealerAI? [#what-is-dealerai]
DealerAI is a conversational AI platform built for automotive dealerships. It automates customer
communication across multiple channels — including SMS, email, webchat, voice, Facebook, Instagram,
and Google Chat — providing intelligent, context-aware responses on behalf of your dealership.
The **DealerAI Reach** feature handles lead enquiries that arrive from dealership websites or
third-party listing sites like AutoTrader.com, routing responses through the most appropriate
channel automatically.
# API Reference (/docs/api)
The DealerAI API is a REST API that lets you integrate with the DealerAI platform programmatically.
All endpoints are under the `/api/v1/` prefix and require **Basic Authentication**.
Authentication [#authentication]
Every request must include an `Authorization` header using HTTP Basic Authentication:
```
Authorization: Basic
```
Use the [/api/v1/authentication/verify](/docs/api/api/v1/authentication/verify/post) endpoint to validate credentials and retrieve your `dealer_id`.
Base URL [#base-url]
| Environment | Base URL |
| ----------- | --------------------------------- |
| Production | `https://engine.dealerai.com` |
| Staging | `https://engine-stg.dealerai.dev` |
| Dev | `https://engine-dev.dealerai.dev` |
Endpoint Groups [#endpoint-groups]
# Getting Started (/docs/getting-started)
This guide covers the two most important areas to set up before you start using DealerAI:
your **General Settings** (dealership profile and channels) and **Reach** (automated customer
outreach). Getting these right first ensures the AI introduces your dealership correctly and
follows up with leads automatically from day one.
Start by signing in to the DealerAI portal at **[https://portal.dealerai.com](https://portal.dealerai.com)**.
Step 1 — Configure General Settings [#step-1--configure-general-settings]
Navigate to **Settings** in the sidebar and select your dealership. See the full [Settings guide](/docs/portal/settings) for a reference to every option.
Dealership Profile [#dealership-profile]
Fill in your dealership's core details under the **General Info** tab. The AI uses this
information when customers ask basic questions like your address, phone number, or website.
| Field | What to enter |
| ------------------- | ---------------------------------------------------------- |
| **Dealership name** | The name as you want it spoken to customers |
| **Website URL** | Your main dealership website |
| **Logo** | Upload your dealership logo (used in webchat and emails) |
| **Primary contact** | Main switchboard phone and general enquiries email |
| **Address** | Full street address |
| **Timezone** | Your local timezone — important for appointment scheduling |
Business Hours [#business-hours]
Under the **Hours** tab, set the opening and closing times for each department:
* **Sales** hours
* **Service** hours
* **Parts** hours
For each day, either set a time range or mark the day as closed. The AI will only offer
appointment slots within these hours and will inform customers of your hours when asked.
Set up your hours before enabling appointment booking in your AI agents — the AI needs
accurate hours to offer valid time slots to customers.
Activate Your Channels [#activate-your-channels]
Under the **Activation & Features** tab, enable the channels your dealership will use:
| Channel | When to enable |
| ----------- | ----------------------------------------------------------- |
| **Webchat** | You have the widget embedded (or plan to) on your website |
| **SMS** | You want to send and receive text messages with customers |
| **Email** | You want to handle customer email enquiries |
| **Voice** | You want the AI to answer and make phone calls |
| **Reach** | You want automated follow-up and re-engagement (see Step 2) |
Only enable channels that are fully configured. Channels that are enabled but not fully set up
may result in customers receiving no response.
Webchat Appearance [#webchat-appearance]
If you're using webchat, configure its look under the **Webchat** tab:
| Setting | Recommendation |
| -------------------- | ----------------------------------------------------------- |
| **Widget title** | Use your dealership name or "Chat with us" |
| **Greeting message** | A friendly opening (e.g., "Hi! How can we help you today?") |
| **Primary colour** | Match your dealership's brand colour |
| **Position** | Bottom-right is the industry standard |
Use **[Preview](/docs/portal/preview)** to test the widget appearance before going live. To embed the widget on your website, see the [Webchat Installation guide](/docs/webchat/installation).
***
Step 2 — Configure Reach [#step-2--configure-reach]
Navigate to **Reach** in the sidebar and select your dealership. See the full [Reach guide](/docs/portal/reach) for a reference to every option.
Reach automates your lead follow-up and re-engagement so no enquiry goes unanswered — even
outside of business hours.
Enable Reach [#enable-reach]
Open the **General Configuration** tab and confirm:
| Setting | Recommended value |
| -------------------- | ------------------------------------------ |
| **Reach enabled** | On |
| **Default channel** | SMS (higher open rates than email) |
| **Opt-out handling** | Respect all opt-outs immediately |
| **Timezone** | Match the timezone set in General Settings |
Set Up a Follow-Up Sequence [#set-up-a-follow-up-sequence]
A Follow-Up sequence automatically messages new leads who haven't responded after initial
contact. This is the most impactful sequence to configure first.
Go to
**Reach → Follow-Up**
Click
**Add Step**
for the first follow-up message
Set a delay of
**1 day**
after the initial contact
Write a short, friendly message checking in (e.g., "Hi
{"{{first_name}}"}
, just following up on your enquiry — happy to answer any questions!")
Add a second step with a
**3 day**
delay as a final nudge
Click
**Save**
Keep follow-up messages brief and conversational. Customers are more likely to respond to a
natural message than a formal sales pitch.
Configure Lead Routing [#configure-lead-routing]
Under **Forward Leads**, assign incoming leads from different sources to the correct AI agent:
* Leads from AutoTrader or Cars.com → **Sales Agent**
* Service form submissions → **Service Agent**
This ensures every lead is handled by an agent that knows how to respond to that type of enquiry.
Set a Fall-Through Action [#set-a-fall-through-action]
Under **Fall-Through**, configure what happens to leads that complete all sequences without a
response. A recommended starting point:
* Send a closing message: "We'll be here whenever you're ready — feel free to reach out any time."
* Flag the contact for manual review
***
What's Next [#whats-next]
Once Settings and Reach are configured, continue setting up the rest of your dealership:
# How to invite a staff member (/docs/getting-started/invite-a-staff-member)
Invite colleagues to the DealerAI portal so they can join conversations, work leads, and manage
your AI configuration. Only **Admins** and **Org Admins** can invite new users.
Invite a user [#invite-a-user]
Go to
**Settings → Users**
(or
**Organizations → Users**
if you manage multiple stores).
Click
**Invite User**
.
Enter the user's
**email address**
and
**full name**
.
Choose the
**Role**
that matches their responsibilities (see role guide below).
If you manage multiple dealerships, select which
**stores**
the user can access.
Click
**Send Invite**
.
The user will receive an email with a link to set their password and sign in for the first time.
Choose the right role [#choose-the-right-role]
| Role | Best for | Key access |
| ------------- | -------------------------------------- | -------------------------------------------------------------- |
| **Admin** | DealerAI account owner | Full access including billing, organizations, and all settings |
| **Org Admin** | General manager across multiple stores | All stores in the organization, no billing |
| **User** | Sales, BDC, and service staff | Conversations, leads, appointments, contacts, inventory |
| **Onboarder** | Setup specialist | Settings, knowledge base, agents (limited day-to-day access) |
Pick the most restrictive role that still lets the person do their job. Roles can always be
upgraded later.
Resend or revoke an invite [#resend-or-revoke-an-invite]
If the user didn't receive the invite or their link expired:
Open
**Settings → Users**
.
Find the pending invite in the list.
Click
**Resend**
to send a fresh email, or
**Revoke**
to cancel the invite.
Remove a user [#remove-a-user]
Open
**Settings → Users**
.
Find the user, click the menu (⋮) on their row, and choose
**Remove**
.
Confirm the removal.
Removed users immediately lose access to the portal. Conversations they handled remain in your
records.
# How to log in and reset your password (/docs/getting-started/log-in-and-reset-password)
This guide covers signing in to the portal and resetting your password if you've forgotten it.
Sign in [#sign-in]
Open
**[https://portal.dealerai.com](https://portal.dealerai.com)**
in your browser.
Enter the
**email address**
associated with your DealerAI account.
Enter your
**password**
.
Click
**Sign In**
.
If your organization uses single sign-on (Google, Microsoft, or Apple), use the matching button
on the sign-in screen instead of entering a password.
Bookmark the portal URL for quick access. The portal is fully responsive and also works in
your mobile browser, or you can install the dedicated mobile app from the App Store or Google
Play.
Reset a forgotten password [#reset-a-forgotten-password]
From the sign-in page, click
**Forgot password?**
Enter the email address on your account and click
**Send reset link**
.
Check your inbox for an email from DealerAI. Open it and click the
**Reset password**
link.
Enter and confirm a new password, then click
**Save**
.
Return to the sign-in page and log in with the new password.
If the reset email doesn't arrive within a few minutes, check your spam folder. If it's still
missing, ask your organization administrator to verify the email on file for your account.
Change your password while signed in [#change-your-password-while-signed-in]
Click your
**profile avatar**
in the top-right of the portal.
Select
**Profile**
(or
**Account Settings**
).
Open the
**Security**
section.
Enter your current password, then your new password twice, and click
**Save**
.
Troubleshooting [#troubleshooting]
| Problem | Try this |
| --------------------------- | ----------------------------------------------------------------------------------------------- |
| "Invalid credentials" error | Confirm caps lock is off and the email is correct. Use **Forgot password** if unsure. |
| Reset email never arrives | Check spam, then ask your admin to confirm the email on your account. |
| Account locked | Contact your organization administrator to unlock the account. |
| SSO sign-in fails | Make sure you're using the same provider (Google/Microsoft/Apple) the account was created with. |
# How to switch between dealerships (/docs/getting-started/switch-between-dealerships)
If you manage more than one store, you can quickly switch the active dealership without signing
out. The portal scopes most pages — Conversations, Leads, Inventory, Settings, Knowledge Base —
to the dealership you currently have selected.
Switch the active dealership [#switch-the-active-dealership]
Click the
**dealership picker**
in the top navigation bar (it shows the currently selected store name).
Start typing to filter, or scroll the list to find the store.
Click the dealership you want to switch to.
The page reloads with data for the selected dealership. Your selection is remembered the next
time you sign in.
Work across multiple dealerships at once [#work-across-multiple-dealerships-at-once]
Some pages — Analytics dashboards, Leads, Reach reports — support a **multi-dealer picker**
that lets you select several stores at the same time:
Open the multi-dealer picker.
Tick each store you want to include, or click
**Select All**
.
Close the picker; the page refreshes with combined results.
Multi-dealer mode is read-only. To **edit** settings, knowledge, or agents, switch to a single
dealership using the regular picker.
Tips [#tips]
* **Keep an eye on the picker** before making edits — it's easy to update the wrong store's
settings if you've recently switched.
* **Org Admins** see every store in the organization. **Users** only see stores they've been
granted access to.
* If a store is missing from your picker, ask your Org Admin to grant you access under
**Settings → Users**.
# How to update your profile and notifications (/docs/getting-started/update-your-profile)
Your profile controls how you appear inside the portal and how DealerAI notifies you about new
conversations, leads, and assignments.
Update your profile [#update-your-profile]
Click your
**avatar**
in the top-right of the portal.
Select
**Profile**
.
Edit any of the fields below and click
**Save**
.
| Field | Notes |
| ---------------- | ------------------------------------------------------ |
| **Display name** | Shown to teammates and on conversation handoffs |
| **Email** | Used for sign-in and notifications |
| **Phone** | Optional, used for SMS notifications if enabled |
| **Avatar** | Upload a square image; appears in conversation threads |
| **Time zone** | Used for displaying timestamps and scheduling |
| **Language** | Portal interface language |
Configure notifications [#configure-notifications]
Open the **Notifications** section of your profile to choose how you're alerted:
| Event | Channels available |
| --------------------------------- | --------------------------------- |
| New conversation assigned to me | In-app, Email, Push (mobile), SMS |
| Conversation needs human takeover | In-app, Email, Push |
| New lead in my queue | In-app, Email |
| Appointment booked | In-app, Email |
| Daily summary | Email |
Tick the channels you want for each event, then click **Save**.
If you use the DealerAI mobile app, enable **Push** notifications for fast alerts when you're
away from your desk. Push works on iOS and Android.
Change your password [#change-your-password]
From your profile, open the
**Security**
section.
Enter your current password.
Enter and confirm your new password.
Click
**Save**
.
Sign out from all devices [#sign-out-from-all-devices]
If you've signed in on a shared computer or lost a device:
Open
**Profile → Security**
.
Click
**Sign out everywhere**
.
You'll be prompted to sign in again on this device.
# Facebook (/docs/integrations/facebook)
Please follow the instructions below to grant DealerAI chatbot access to your dealership's
Facebook Page.
Grant Page access [#grant-page-access]
Login to Meta Business Manager or Meta Business Suite at
[business.facebook.com](https://business.facebook.com).
Go to **Settings → Users → Partners**, and use the **Add** button to give a partner access
to your assets. The Partner Business ID is **2162540007339603**.
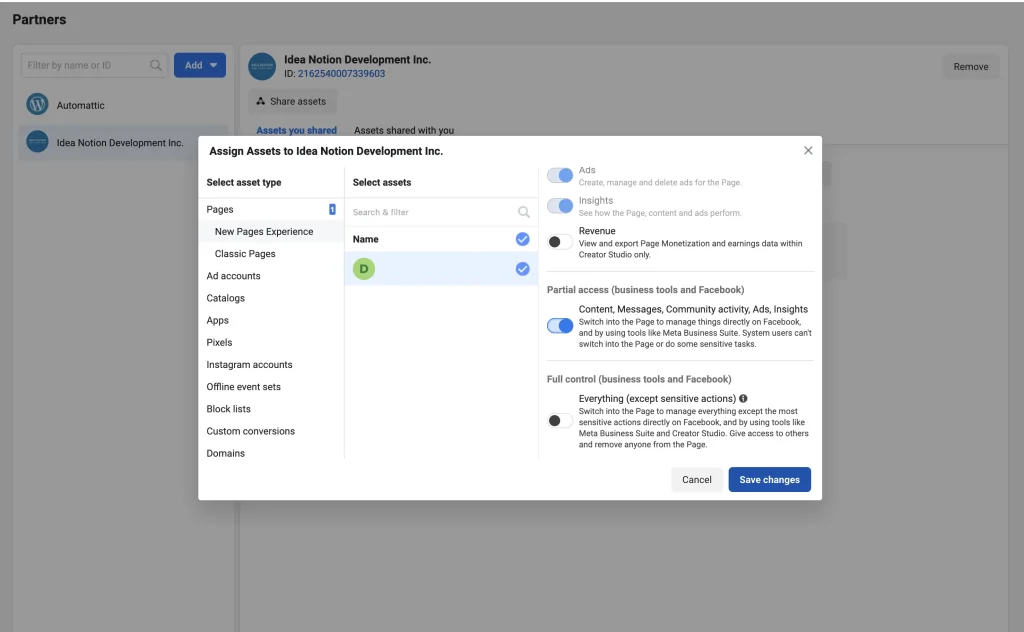
Provide **Partial Access** to your Facebook Page.
Let your DealerAI account manager / support staff know once this access has been granted.
Add the partner [#add-the-partner]
Grant Partial Access to your Page [#grant-partial-access-to-your-page]
Once access is granted, notify your DealerAI account manager or support staff so they can
finish connecting your Facebook Page to the chatbot.
# Integrations (/docs/integrations)
The Integrations section lets you connect DealerAI to the external systems your dealership
already uses — CRMs, inventory platforms, and scheduling tools — so data flows automatically
between them without manual re-entry.
Overview [#overview]
Navigate to **Integrations** in the sidebar to access integration agents.
Integration Agents [#integration-agents]
Integration Agents are pre-configured connectors for popular automotive platforms. Enabling an
agent activates the two-way data sync between DealerAI and that platform.
Supported Platforms [#supported-platforms]
| Platform | Capabilities |
| ---------------- | ----------------------------------------------------------------------- |
| **VinSolutions** | Push leads and appointments into the VinSolutions CRM |
| **DealerSocket** | Sync lead data and appointment details with DealerSocket |
| **Fortellis** | Access automotive data services and inventory via the Fortellis network |
| **XTime** | Sync service appointments with XTime scheduling |
Contact your DealerAI account manager to enable additional integration agents not listed here.
Availability may depend on your subscription plan.
Configuring an Integration Agent [#configuring-an-integration-agent]
Go to
**Integrations → Integration Agents**
Find the platform you want to connect and click
**Configure**
Enter the required credentials (API key, dealer ID, or OAuth details) from your external platform account
Click
**Save and Test**
to verify the connection is working
Toggle the integration
**Active**
to begin data sync
# Portal Guide (/docs/portal)
The DealerAI portal is the central management interface for your dealership's AI-powered
communication system. From here you configure your AI agents, monitor live conversations,
manage your vehicle inventory, track leads and appointments, and review performance analytics.
You can access the live portal at **[https://portal.dealerai.com](https://portal.dealerai.com)**.
What is DealerAI? [#what-is-dealerai]
DealerAI is a conversational AI platform built for automotive dealerships. It automates customer
communication across multiple channels — SMS, email, webchat, voice, Facebook, Instagram, and
Google Chat — providing intelligent, context-aware responses on behalf of your dealership.
Key capabilities [#key-capabilities]
| Capability | Description |
| ------------------------- | ----------------------------------------------------------------------------------- |
| **Live conversations** | Monitor and join AI-led chats in real time across all channels |
| **Automated outreach** | Follow up with leads and re-engage past customers automatically via SMS and email |
| **AI agents** | Specialist agents for Sales, Service, Test Drive, Parts, Lease Return, and Trade-In |
| **Lead & ADF processing** | Automatically respond to leads from AutoTrader, Cars.com, and your website |
| **Appointment booking** | AI books Sales, Service, and Test Drive appointments and adds them to your calendar |
| **Inventory awareness** | The AI knows your current stock and answers detailed vehicle questions |
Channels [#channels]
DealerAI handles inbound and outbound communication across:
| Channel | Direction |
| ------------------------- | ------------------ |
| WebChat (embedded widget) | Inbound |
| SMS | Inbound & Outbound |
| Email | Inbound & Outbound |
| Voice (phone calls) | Inbound & Outbound |
| Facebook Messenger | Inbound |
| Instagram DMs | Inbound |
| Google Chat | Inbound |
Portal Sections [#portal-sections]
Access and Roles [#access-and-roles]
Access to portal sections depends on your assigned role:
| Role | Access level |
| ------------- | ------------------------------------------------------------------------ |
| **Admin** | Full access including organization management, billing, and all settings |
| **Org Admin** | Access across all stores within an organization |
| **User** | Day-to-day features: conversations, leads, inventory, appointments |
If you cannot see a section described in this guide, contact your organization administrator to
review your role permissions.
# Action Buttons (/docs/webchat/action-buttons)
Action buttons are pre-defined quick-reply shortcuts shown to customers on the webchat welcome
screen before they start typing. They let customers jump directly into a topic — such as
scheduling a service appointment or browsing inventory — with a single tap.
How Action Buttons Work [#how-action-buttons-work]
When a customer clicks an action button, the widget sends a message to the AI on their behalf.
The button can either:
* **Send a message** — The bot receives the text and continues the conversation as if the
customer had typed it themselves
* **Trigger an API event** — An event is dispatched to your website JavaScript for custom handling
The AI then responds in the same way it would to any customer message.
Configuring Action Buttons [#configuring-action-buttons]
Action buttons are managed in the DealerAI portal under **Settings → Webchat → Action Buttons**.
You can add, reorder, and remove buttons without touching any website code.
Each button has two required fields:
| Field | Description |
| ----------- | ----------------------------------------------------------- |
| **Title** | The label displayed on the button (e.g., "Book a Service") |
| **Message** | The text sent to the AI when the customer clicks the button |
Example configuration [#example-configuration]
| Title | Message sent to AI |
| -------------------- | ----------------------------------------------- |
| Book a Service | I'd like to book a service appointment |
| Browse Inventory | Show me your available vehicles |
| Get a Trade-In Value | What's my car worth? |
| Contact Sales | I'd like to speak to someone about buying a car |
Dynamic Action Buttons via Active Messages [#dynamic-action-buttons-via-active-messages]
If you have configured [Active Messages](/docs/portal/active-messages), the action buttons
shown in the welcome screen can be overridden by the matching active message rule. This lets
you tailor the button set to the page the customer is currently browsing.
For example, when a customer is on a vehicle detail page:
* **Default buttons**: Browse Inventory, Book a Service, Contact Sales
* **Active message override buttons**: More about this vehicle, Test Drive, Finance Calculator
Active messages are evaluated in real time when the widget loads, so the correct buttons
appear automatically without any extra code.
Appearance [#appearance]
Action buttons appear as pill-shaped tap targets in the welcome screen, below the welcome
message. They inherit the widget's primary accent colour for their border and text on the
light theme, and switch to white text on the dark theme.
On mobile, buttons stack vertically for easier tapping. On desktop, they flow horizontally and
wrap to multiple rows when needed.
There is no hard limit on the number of action buttons, but we recommend no more than
**5–6 buttons** to avoid overwhelming customers. Too many choices can reduce engagement.
# Configuration (/docs/webchat/configuration)
Widget configuration is managed in the DealerAI portal under **Settings → Webchat**. Changes
take effect immediately — no redeployment or code changes on your website are required.
Appearance [#appearance]
| Setting | Description |
| -------------------- | ------------------------------------------------------------------ |
| **Widget title** | Text shown at the top of the chat window (e.g., "Chat with us") |
| **Greeting message** | The first message customers see when they open the widget |
| **Primary colour** | The accent colour matching your dealership's branding |
| **Position** | Where the widget appears on the page — bottom-right or bottom-left |
| **Offline message** | Text shown to customers when outside of business hours |
| **Logo** | Upload a dealership logo shown in the chat header |
| **Avatar** | Upload a custom avatar for bot messages |
Use [Preview](/docs/portal/preview) in the portal to see how your widget looks with the
current settings before your customers see it.
Window Style [#window-style]
The widget supports three visual styles, configurable under **Settings → Webchat**:
| Style | Description |
| -------------- | ------------------------------------------------------------------------ |
| `window` | A traditional rectangular chat window pinned to the corner of the screen |
| `roundbox` | A rounded, card-style window — similar to `window` but with softer edges |
| `speechbubble` | A speech bubble that floats above a compact chat head icon |
All three styles support the same feature set. The style is also automatically forced to
`window` when the widget is used in [expand mode](/docs/webchat/installation#example-with-expand-mode).
Dark Mode [#dark-mode]
The widget ships with both a **light** and a **dark** theme. Customers can toggle between them
using the theme button in the chat header. The active theme selection is persisted in a cookie
so it is remembered across sessions.
You can set the default theme mode under **Settings → Webchat → Theme**.
Enabling the Webchat Channel [#enabling-the-webchat-channel]
The Webchat channel must be active for the widget to respond to visitors. To enable it:
Go to
**Settings**
in the portal sidebar and select your dealership
Open the
**Activation & Features**
tab
Toggle
**Webchat**
to enabled
Save your changes
If Webchat is disabled, the widget will still appear on your website but will display an
offline message instead of starting a live chat session.
Business Hours [#business-hours]
The AI uses the hours configured under **Settings → Hours** to determine when the webchat
is considered available. Outside of these hours, customers see the offline message.
Configure separate availability for:
* **Sales** hours
* **Service** hours
* **Parts** hours
For one-off closures, add dates in the [Holidays](/docs/portal/holidays) section.
Widget Behaviour [#widget-behaviour]
Language Support [#language-support]
The widget automatically detects the visitor's browser language and responds in that language
if it is supported. The default fallback language is English. Supported languages can be
restricted under **Settings → Webchat → Supported Languages**.
VIN Detection [#vin-detection]
If a visitor is browsing a specific vehicle page on your website, the widget automatically
detects the Vehicle Identification Number (VIN) from the page and passes it to the AI. This
allows the AI to answer questions about that specific vehicle without the customer having to
specify it.
The widget integrates with the DDC (Digital Dealer Communications) API for VIN detection on
DealerSocket-powered websites. On other platforms, VIN detection uses URL and meta tag parsing.
Session Persistence [#session-persistence]
Chat sessions persist across page navigation. If a customer starts a conversation on one
page and navigates to another, the conversation continues uninterrupted. Session state is
stored in browser cookies scoped to the dealer ID, with a 7-day TTL.
Idle Timeout [#idle-timeout]
If a customer is inactive for a configurable period, a countdown dialog appears asking whether
they want to continue or reset the conversation. The idle time threshold is set under
**Settings → Webchat → Idle Time**.
Private Mode [#private-mode]
When **Private Mode** is enabled, the widget only opens for visitors who have been passed
a valid user context via the `data-override-private` attribute in combination with pre-filled
user attributes. This is useful for authenticated portals where you only want to allow chat
for verified customers.
URL Allow / Block Lists [#url-allow--block-lists]
You can restrict which pages of your website show the widget:
* **Allow list** — Only show the widget on URLs that match the specified patterns
* **Block list** — Show the widget everywhere except URLs that match the specified patterns
Configure these lists under **Settings → Webchat → URL Restrictions**.
SMS Handoff [#sms-handoff]
When the SMS channel is configured and enabled, a **Text Us** button appears in the chat
header, allowing customers to switch from webchat to SMS. This is particularly useful when
a customer needs to leave the website but still wants to continue the conversation.
Enable this under **Settings → Webchat → Show SMS Button**.
# Customization (/docs/webchat/customization)
Beyond the standard portal settings, the DealerAI webchat widget exposes several advanced
customization mechanisms for developers and designers who need precise control over the
widget's look and feel.
Branding Colours [#branding-colours]
The widget's primary accent colour is set in the portal under **Settings → Webchat → Primary
Colour**. This colour applies to:
* The chat head button background
* The send button
* Action button borders and highlights
* The typing indicator
The accent colour is delivered to the widget via the API configuration and applied at runtime,
so no rebuild or redeployment is needed when you change it.
Theme Mode [#theme-mode]
The widget supports **light** and **dark** themes. Each theme defines a complete set of CSS
custom properties (variables) that control every colour in the UI.
| Variable | Light | Dark | Description |
| -------------------------------------------------- | --------- | --------- | ----------------------------- |
| `--theme-webchat-welcome-background-color` | `#ffffff` | `#212121` | Welcome screen background |
| `--theme-webchat-welcome-message-background-color` | `#ececed` | `#2e2e2e` | Bot message bubble background |
| `--theme-webchat-welcome-message-color` | `#000000` | `#ffffff` | Bot message text colour |
| `--theme-chat-window-header-background-color` | `#ffffff` | `#212121` | Chat window header background |
| `--theme-dialog-background-color` | `#fff` | `#212121` | Modal dialog background |
| `--theme-buy-window-background-color` | `#ffffff` | `#212121` | Payment window background |
The default theme can be configured under **Settings → Webchat → Default Theme Mode**.
Individual customers can toggle their preferred theme using the theme button in the chat
header — their choice is remembered via cookie.
Window Styles [#window-styles]
Three visual window styles are available:
`speechbubble` [#speechbubble]
A compact, speech-bubble-style welcome panel that floats above the chat head. Well-suited
for sites where you want a minimal footprint. The customer clicks the bubble or the chat head
to open the full chat window.
`window` [#window]
A traditional rectangular chat window anchored to the bottom corner. This is the most familiar
pattern and works well on most dealership websites.
`roundbox` [#roundbox]
Similar to `window` but with rounded corners and a card-style shadow. Gives a more modern,
softer feel.
Set the window style under **Settings → Webchat → Window Style**.
When the widget is used in [expand mode](/docs/webchat/installation#example-with-expand-mode),
the window style is automatically forced to `window` regardless of the portal setting.
Custom Inner CSS [#custom-inner-css]
For fine-grained styling adjustments, you can inject custom CSS into the widget via the portal
under **Settings → Webchat → Custom CSS**. This CSS is injected into the page `` and can
override widget-specific CSS custom properties.
Changing the accent colour dynamically [#changing-the-accent-colour-dynamically]
```css
/* Override accent on a specific page */
dealerai-chat .theme-light {
--theme-webchat-welcome-message-background-color: #f0f4ff;
--theme-webchat-welcome-message-color: #1a1a2e;
}
```
Adjusting chat window dimensions [#adjusting-chat-window-dimensions]
```css
/* Taller chat window on desktop */
@media (min-width: 768px) {
dealerai-chat .dealerai-chat-window {
height: 680px;
width: 400px;
}
}
```
Hiding the send button label [#hiding-the-send-button-label]
```css
dealerai-chat .webchat__send-button__text {
display: none;
}
```
Custom CSS is injected at the page level and targets elements inside the `dealerai-chat`
custom element. Use the `dealerai-chat` selector prefix to scope all rules correctly and
avoid affecting the rest of your website.
Logo and Avatar [#logo-and-avatar]
Dealership Logo [#dealership-logo]
Upload a logo under **Settings → Webchat → Logo**. The logo appears in the chat window header
alongside the widget title. Accepted formats: PNG, JPG, SVG. Recommended size: 120 × 40 px.
Bot Avatar [#bot-avatar]
Upload a custom avatar image under **Settings → Webchat → Avatar**. The avatar is shown next
to every bot message bubble inside the chat window. Recommended size: 48 × 48 px (square).
Bot Framework WebChat Style Overrides [#bot-framework-webchat-style-overrides]
The chat area (after the customer engages) is rendered by Microsoft Bot Framework WebChat.
You can override its internal style variables by injecting CSS that targets Bot Framework's
CSS classes within the `dealerai-chat` scope:
```css
/* Make bot message bubbles use a custom font */
dealerai-chat .webchat__bubble__content {
font-family: 'Your Brand Font', sans-serif;
}
/* Adjust suggested action button appearance */
dealerai-chat .webchat__suggested-actions__button {
border-radius: 20px;
font-size: 13px;
}
```
Bot Framework WebChat CSS class names are prefixed with `webchat__`. You can inspect
the rendered HTML in DevTools to discover the exact class names for any element you
want to style.
Disabling Audio [#disabling-audio]
By default the widget can play audio notifications. To disable audio support, turn off
**Settings → Webchat → Enable Audio Support** in the portal.
# Webchat (/docs/webchat)
The DealerAI Webchat widget is an embeddable chat component that lets customers start a
conversation with your AI directly from your dealership website. It connects to the full
DealerAI platform — the AI can answer questions, book appointments, surface inventory, and
hand off to a human agent when needed.
Overview [#overview]
How it Works [#how-it-works]
1. A visitor opens the chat widget on your dealership website
2. The widget connects to the DealerAI bot engine via a secure DirectLine session
3. The AI responds in real time using your configured agents, inventory, and Knowledge Base
4. If the customer books an appointment or submits a lead, it flows into the DealerAI portal automatically
Architecture [#architecture]
The widget ships as a **Web Component** (``) that bootstraps a full React
application inside an isolated Shadow DOM. This means the widget's styles never conflict with
your website's existing CSS, and no extra style isolation is needed on your end.
Communication between the widget and your website JavaScript happens through the
[`window.DealerAI` SDK](/docs/webchat/sdk) and custom DOM events.
Prerequisites [#prerequisites]
Before going live with the webchat widget:
* Your dealership is set up in the DealerAI portal
* The **Webchat** channel is enabled under **Settings → Activation & Features**
* Widget appearance is configured under **Settings → Webchat**
* You have tested the widget using [Preview](/docs/portal/preview)
# Installation (/docs/webchat/installation)
The DealerAI webchat widget loads as a custom HTML element via a single JavaScript snippet.
Add it once to your website and the widget will appear on every page automatically.
Embed Code [#embed-code]
Add the following snippet to every page of your dealership website, just before the closing
`` tag:
```html
```
Replace `YOUR_DEALER_ID` with your dealership's ID, which you can find in the DealerAI portal
under **Settings → General Info**.
Attributes [#attributes]
You can pass optional attributes to pre-fill customer information or adjust widget behaviour:
| Attribute | Required | Description |
| ----------------------- | -------- | ----------------------------------------------------------------------------------- |
| `data-dealer-id` | Yes | Your dealership ID — identifies which configuration to load |
| `data-phone` | No | Pre-fill the customer's phone number |
| `data-cid` | No | Pass an external customer ID (e.g. CRM contact ID) to associate with the session |
| `data-expand-mode` | No | Opens the widget in an expanded/full-width layout — useful for dedicated chat pages |
| `data-override-private` | No | Present on the element (no value needed) to bypass private-mode restrictions |
| `data-url` | No | Override the base URL the widget loads assets from — defaults to the script origin |
Example with pre-filled customer data [#example-with-pre-filled-customer-data]
If your website has a logged-in customer portal, you can pass known customer details so
they don't have to re-enter them in the chat:
```html
```
Example with expand mode [#example-with-expand-mode]
Use `data-expand-mode` to embed a full-size chat interface inside a dedicated page or container,
rather than as a floating corner widget:
```html
```
Deferred initialisation [#deferred-initialisation]
By default, the widget initialises as soon as the script loads. To take control of when it
starts, add `?initialize=false` to the script `src` and call
[`window.DealerAI.load()`](/docs/webchat/sdk#load) when you are ready:
```html
```
Placement Recommendations [#placement-recommendations]
* Add the snippet to your **global site template** so it appears on every page
* Place it in the `` — avoid placing it in ``
* If you use a **tag manager** (e.g., Google Tag Manager), inject the snippet via a custom
HTML tag fired on All Pages
Verifying the Installation [#verifying-the-installation]
After adding the snippet:
Open your website in a browser
Look for the chat button in the bottom corner of the page
Click the button to open the widget and send a test message
Confirm the AI responds with your dealership's configured greeting
If the widget does not appear, check that:
* The `data-dealer-id` attribute is set correctly
* The Webchat channel is enabled in **Settings → Activation & Features**
* There are no JavaScript errors in the browser console blocking the script
Content Security Policy (CSP) [#content-security-policy-csp]
If your website uses a Content Security Policy, add the following directives to allow the
widget to load and connect to the DealerAI services:
```
script-src 'self' https://webchat.dealerai.com;
connect-src 'self' https://webchat.dealerai.com https://engine.dealerai.com;
frame-src 'self' https://webchat.dealerai.com;
font-src 'self' https://fonts.gstatic.com;
style-src 'self' https://webchat.dealerai.com https://fonts.googleapis.com;
```
The widget runs in an isolated Shadow DOM to prevent CSS conflicts with your website's
existing styles. No additional style isolation is needed on your end.
# JavaScript SDK (/docs/webchat/sdk)
The DealerAI webchat widget exposes a `window.DealerAI` JavaScript API that lets you open,
close, and send messages from your own website code.
Availability [#availability]
The `window.DealerAI` object is created synchronously when the loader script is parsed —
before the React bundle has finished downloading. Actions that affect the chat (open, send,
etc.) should be called after the page has loaded.
***
Methods [#methods]
`api(payload)` [#apipayload]
The primary method for sending commands to the widget.
```javascript
window.DealerAI.api({ action: 'ACTION_NAME', data: { /* ... */ } });
```
| Action | Description |
| ----------- | --------------------------------------------------------- |
| `openchat` | Open the chat window |
| `closechat` | Close the chat window |
| `send` | Open the chat and send a message or metadata to the AI |
| `message` | Send a raw message to the chat without opening the window |
| `reset` | Reset the conversation and start a new session |
Open the chat window [#open-the-chat-window]
```javascript
window.DealerAI.api({ action: 'openchat' });
```
Close the chat window [#close-the-chat-window]
```javascript
window.DealerAI.api({ action: 'closechat' });
```
Open the chat and send a message [#open-the-chat-and-send-a-message]
When the customer clicks a custom button on your website (e.g., "Ask about this car"), you
can open the chat and pre-send a message — including a VIN and an optional hint — so the AI
immediately responds in context:
```javascript
window.DealerAI.api({
action: 'send',
data: {
vin: '1HGBH41JXMN109186',
hint: 'The customer wants to know about financing options for this vehicle.',
},
});
```
The `data` object is sent as metadata to the AI on `webchat/join`. Supported fields:
| Field | Type | Description |
| ------ | -------- | -------------------------------------------------------------- |
| `vin` | `string` | VIN of the vehicle the customer is interested in |
| `hint` | `string` | Contextual hint passed to the AI to guide the opening response |
Reset the conversation [#reset-the-conversation]
```javascript
window.DealerAI.api({ action: 'reset' });
```
This ends the current DirectLine session, clears the message history, and starts fresh.
Use this after a customer logs out or after a completed transaction.
***
`load()` [#load]
Initialise the widget. Only needed when you have set `?initialize=false` on the script URL
to defer widget startup.
```javascript
window.DealerAI.load();
```
See [Deferred initialisation](/docs/webchat/installation#deferred-initialisation) for the
full usage pattern.
***
`unload()` [#unload]
Completely unmount the widget from the page and remove all event listeners.
```javascript
window.DealerAI.unload();
```
Call `window.DealerAI.load()` to remount it. Useful for single-page applications that need
to tear down and rebuild the widget when the current route changes significantly (e.g., when
navigating from a public page to an authenticated portal).
***
Full Integration Example [#full-integration-example]
The following example shows a typical integration on a vehicle detail page where a custom
**Ask about this car** button opens the chat in context with vehicle information:
```html
```
Analytics Events [#analytics-events]
The widget automatically tracks interactions and fires events to Google Analytics 4 (GA4)
and ShiftDigital / ASC if configured. No extra code is required on your end.
To enable GA4 tracking, configure your GA4 Measurement ID under
**Settings → Webchat → Custom Tracking → GA4 ID**.
| GA4 / ASC event | Trigger |
| ----------------- | ----------------------------- |
| Chat impression | Widget is displayed on page |
| Chat click / open | Customer opens the widget |
| Lead | Customer submits a lead form |
| Appointment | Customer books an appointment |
GA4 events are only fired if the `window.google_tag_manager` object is present on the
page. If you use a tag manager such as Google Tag Manager, ensure the GTM container
fires on all pages before the DealerAI widget script.
# How to configure agent parameters (/docs/portal/agents/configure-agent-parameters)
Beyond the system prompt, each agent has configurable parameters that define its capabilities —
which tools it can call, what actions it can take, and behavioral settings like whether it's
enabled or active.
Access agent parameters [#access-agent-parameters]
Go to
**Agents**
from the sidebar.
Select the agent you want to configure.
Scroll to the
**Parameters**
section below the prompt editor.
Toggle agent status [#toggle-agent-status]
Each agent has two key toggles:
* **Enabled** — Whether the agent is available in the system at all. Disabling an agent removes
it from the conversation flow entirely.
* **Is Active** — Whether the agent is currently handling inquiries. An enabled but inactive
agent exists in the system but won't be routed to.
Configure parameters [#configure-parameters]
Parameters define the inputs an agent expects when it's invoked. Each parameter has:
Click
**Add Parameter**
to create a new one, or edit an existing parameter.
Set the
**Name**
— a clear identifier (e.g., "vehicle_type", "budget_range").
Choose the
**Type**
— string, integer, boolean, or other supported types.
Add a
**Description**
— explains what the parameter is for (helps the AI use it correctly).
Toggle
**Is Required**
if the parameter must be provided before the agent can proceed.
Click
**Save**
to apply changes.
What parameters control [#what-parameters-control]
Parameters work with the agent's tools and actions:
* **Tools** return information to the agent (e.g., search inventory, look up location)
* **Actions** transfer control to another agent (e.g., hand off to Finance Agent)
* Parameters define what data the tools and actions need to function
Changes to parameters affect how the AI interacts with internal systems. If you're unsure
about a parameter's purpose, check with your administrator before modifying it.
Tips [#tips]
* Keep parameter descriptions clear — the AI uses them to decide when and how to fill values.
* Mark parameters as required only when the agent truly cannot proceed without them.
* Test changes using **Preview** to confirm the agent still functions correctly.
# How to edit an agent prompt (/docs/portal/agents/edit-an-agent-prompt)
Each AI agent (Sales, Service, Test Drive, etc.) has a system prompt that defines its
personality, knowledge boundaries, and response style. Editing the prompt lets you fine-tune
how the agent communicates with customers.
Edit a prompt [#edit-a-prompt]
Go to
**Agents**
from the sidebar.
Select the agent you want to modify (e.g., Sales Agent, Service Agent).
Locate the
**Prompt**
section — this contains the agent's system instructions.
Edit the prompt text using the rich-text editor. You can toggle between formatted and
**Markdown Plain**
mode for precise control.
Click
**Save**
to apply your changes.
Changes take effect on the next new conversation. Active conversations continue using the
prompt that was in place when they started.
Tips [#tips]
* Keep prompts focused — an agent with too many instructions may become inconsistent.
* Test your changes using the **Preview** feature before going live.
* Use bullet points for rules — the AI follows structured instructions more reliably.
* Review conversation logs after making changes to verify the agent behaves as expected.
# AI Agents (/docs/portal/agents)
The **AI Agents** section is where you manage the dealership-facing agents that power DealerAI conversations and bookings.
Overview [#overview]
In the current portal UI, the Agents screen includes:
* A **Train AI** action in the page header
* An **Add** action for creating or adding agent records
* A left sidebar grouping agent types and related configuration areas
* A **Default Agents** group containing built-in appointment agents
* Additional groups for **Custom Agents** and **Outbound Agents** when enabled
* A main editor area for the selected agent's settings
Default agents [#default-agents]
The built-in default agents currently shown in the portal are:
* **Service Agent**
* **Test Drive Agent**
* **Sales Agent**
* **Lease Return Agent**
* **Parts Agent**
* **Trade-In Agent**
Agent edit view [#agent-edit-view]
When you open an agent such as **Service Agent**, the editor can include configuration areas such as:
* Operating hours by day of week
* Appointment booking enablement
* Agent-specific instructions and behavior
* Availability or scheduling constraints
The exact fields vary by agent type, but the overall workflow stays consistent: pick an agent from the sidebar, edit its settings, then save and retrain if needed.
Custom and outbound agents [#custom-and-outbound-agents]
Beyond the default appointment agents, the sidebar can also expose:
* **Custom Agents** for dealership-specific use cases
* **Outbound Agents** for proactive outreach scenarios
Use these areas when the standard Sales / Service / Test Drive flows are not enough.
Train AI [#train-ai]
Use **Train AI** after meaningful changes to prompts, appointment behavior, or other agent settings.
This refreshes the AI configuration used by DealerAI so the portal settings and real customer-facing behavior stay in sync.
Typical workflow [#typical-workflow]
Open
**Agents**
from the portal navigation.
Select the dealership you want to work in.
Choose a default, custom, or outbound agent from the left sidebar.
Update the relevant fields in the main editor panel.
Save your changes.
Click
**Train AI**
when the change should affect live AI behavior.
Notes [#notes]
* The sidebar contents can change depending on enabled features.
* Some agent sections are dealership-specific, while others depend on organization-level setup.
* If an agent controls booking behavior, review the related **Appointments** and **Reach** settings as part of the same workflow.
# How to set up outbound agents (/docs/portal/agents/set-up-outbound-agents)
Outbound agents handle automated messages sent to customers proactively — follow-ups,
re-engagement campaigns, and appointment reminders. Setting up an outbound agent
configures how the AI represents your dealership in outgoing communications.
Configure an outbound agent [#configure-an-outbound-agent]
Go to
**Agents**
from the sidebar.
Select the outbound agent or locate the
**Outbound**
configuration section.
Configure the
**Phone Number**
— the number that outbound SMS messages will be sent from.
Set the
**Voice Identity**
— the voice profile used for outbound voice calls (if applicable).
Edit the agent's prompt to define its outbound communication style and goals.
Click
**Save**
to apply.
Outbound vs. inbound agents [#outbound-vs-inbound-agents]
| Aspect | Inbound Agent | Outbound Agent |
| -------- | ------------------------------- | ---------------------------- |
| Trigger | Customer initiates contact | System initiates contact |
| Channels | Webchat, SMS, social | SMS, email, voice |
| Goal | Answer questions, qualify leads | Follow up, re-engage, remind |
| Tone | Reactive, helpful | Proactive, concise |
Link to Reach sequences [#link-to-reach-sequences]
Outbound agents work in tandem with **Reach** sequences:
1. A Reach sequence determines **when** and **why** to contact a customer.
2. The outbound agent determines **how** the message is crafted and delivered.
3. Configure sequences in [Reach settings](/docs/portal/reach/enable-and-configure-reach).
The outbound phone number must be provisioned and verified before messages can be sent.
Contact your administrator if you need a new number set up.
Tips [#tips]
* Keep outbound prompts short and action-oriented — customers respond better to concise messages.
* Test outbound messages with internal numbers before activating campaigns.
* Ensure the voice identity matches your dealership's brand (professional, friendly, etc.).
* Coordinate outbound agent settings with your Reach follow-up and re-engagement configuration.
# How to use common prompts (/docs/portal/agents/use-common-prompts)
Common prompts are reusable prompt blocks that can be shared across different agents.
Instead of duplicating the same instructions in every agent's prompt, define them once
as a common prompt and reference them wherever needed.
Create a common prompt [#create-a-common-prompt]
Go to
**Agents**
from the sidebar.
Click the
**Common Prompts**
button to open the common prompts dialog.
Click
**Add**
to create a new common prompt.
Enter a descriptive
**Name**
(e.g., "Dealership Identity", "Escalation Rules", "Compliance Guidelines").
Write the prompt content — the instructions you want shared across agents.
Click
**Save**
.
Apply a common prompt to an agent [#apply-a-common-prompt-to-an-agent]
Open the agent you want to update.
In the prompt editor, reference or include the common prompt block.
Save the agent configuration.
The common prompt content is injected into the agent's system instructions at runtime.
Tips [#tips]
* Keep common prompts focused on agent's purpose.
* Review common prompts periodically to ensure they reflect current dealership policies.
* Test in **Preview** after making changes to confirm agents behave correctly.
# Analytics (/docs/portal/analytics)
The Analytics section provides visual dashboards so you can track how well DealerAI is performing
for your dealership — how many conversations are happening, how leads are converting, and where
customers are dropping off.
Overview [#overview]
Analytics data is drawn from all conversations and interactions across every connected channel.
Charts and metrics refresh periodically and can typically be filtered by date range and
dealership.
Available Dashboards [#available-dashboards]
Conversation Analytics [#conversation-analytics]
The main analytics dashboard focuses on conversation and lead performance:
| Metric | Description |
| ------------------------ | ------------------------------------------------------------ |
| **Total conversations** | Number of unique conversation threads in the selected period |
| **Active conversations** | Conversations currently in progress |
| **Messages sent** | Total outbound messages sent by the AI and staff |
| **Human takeovers** | How often staff manually joined a conversation |
Conversion Metrics [#conversion-metrics]
Tracks how conversations turn into outcomes:
| Metric | Description |
| ----------------------- | --------------------------------------------------------- |
| **Leads generated** | Customers who expressed buying or service intent |
| **Appointments booked** | Appointments created by the AI during conversations |
| **Appointment rate** | Percentage of leads that resulted in a booked appointment |
Channel Breakdown [#channel-breakdown]
A visual breakdown of conversation volume by channel (WebChat, SMS, Facebook, etc.) helps you
understand where customers prefer to engage.
Interpreting the Charts [#interpreting-the-charts]
Appointment rate is one of the most important indicators of AI effectiveness. A low rate may
signal that the AI agent prompts or conversation flows need tuning — review the Agents section
for configuration options.
* **Trends over time** — bar or line charts show daily or weekly activity so you can spot busy
periods and seasonal patterns
* **Top conversation topics** — categories of questions customers are asking most often
* **Response time** — how quickly the AI (and your staff) are responding to inbound messages
Date Range Filtering [#date-range-filtering]
Use the date picker at the top of the dashboard to select a custom reporting window. Presets such
as **Last 7 days**, **Last 30 days**, and **This month** are available for quick access.
Exporting Data [#exporting-data]
Where available, use the export button to download report data as a CSV for further analysis in
Excel or your CRM.
# Appointments (/docs/portal/appointments)
The **Appointments** section is the scheduling workspace for dealership bookings created or managed through DealerAI.
Calendar view [#calendar-view]
The current Appointments page supports two operating modes:
* **Calendar View**
* **Table View**
Calendar View is ideal for schedule review, while Table View is better for list-based operational work.
The sidebar includes filtering controls for:
* **View Mode**
* **Appointment Type**
The visible appointment-type filters currently include:
* Service
* Test Drive
* Sales
* Parts
* Trade-In
* Lease Return
Appointment detail [#appointment-detail]
Clicking a calendar item opens an appointment detail workflow so users can review the booking more closely and continue into related follow-up actions.
The page also includes a sequence panel so staff can continue follow-up after reviewing a booking.
Typical workflow [#typical-workflow]
Open
**Appointments**
from the navigation.
Choose
**Calendar View**
or
**Table View**
.
Filter by the appointment types you want to review.
Open a booking from the calendar or list.
Use related sequence or conversation tools if post-booking follow-up is needed.
Notes [#notes]
* Appointments is dealership-specific.
* The appointment-type filter is especially useful when different teams handle different booking categories.
* This page is closely related to **Agents** and **Reach**, since agent settings and follow-up rules directly affect the appointment workflow.
# How to edit contact details (/docs/portal/contacts/edit-contact-details)
Contact records are created automatically when customers interact with your dealership
through any channel. You can edit these records to correct information or add details
that the AI didn't capture.
Edit a contact [#edit-a-contact]
Go to
**Contacts**
from the sidebar.
Find the contact using the search bar or by scrolling the list.
Click the contact's name to open their detail view.
Update
**Full Name**
,
**Email**
,
**Phone Number**
, and
**Address**
as needed.
Add or remove
**Tags**
to label the contact (e.g., "VIP", "Service Customer").
Update the
**Source**
field if the origin needs correcting.
Click
**Save**
to update the record.
Changes are immediate — the AI uses the updated information in future interactions.
When to edit contacts [#when-to-edit-contacts]
* Customer provides a corrected phone number or email during a conversation
* You need to add information collected offline (in-person visit, phone call)
* Tagging contacts for segmentation or targeted campaigns
* Correcting AI-captured data that was incomplete or inaccurate
Impact of edits [#impact-of-edits]
Updated contact details affect:
* **Reach sequences** — messages go to the new phone/email
* **AI conversations** — the bot uses the updated name and details
* **Lead exports** — CRM pushes include the corrected information
* **Appointment booking** — confirmation messages use the updated contact info
If a customer has unsubscribed, their record shows an unsubscribed status. You cannot
override this — the customer must re-subscribe themselves to receive messages again.
Tips [#tips]
* Always verify contact changes directly with the customer when possible.
* Use tags to organize contacts by interest (e.g., "SUV", "Financing") for targeted outreach.
* If a contact has duplicate records, consolidate them by updating the primary record and
removing the duplicate.
# Contacts (/docs/portal/contacts)
The **Contacts** section is the portal's customer record workspace for dealership teams.
Contacts list [#contacts-list]
The current Contacts page includes a table with these main columns:
* **Name**
* **Enroll**
* **Phone**
* **Email**
* **In Sequence**
* **Date Created**
* **Last Modified**
At the top of the page, users can access actions such as:
* **Unsubscribed**
* **Enroll**
* **Add**
* **Delete**
Contact detail view [#contact-detail-view]
When you open a contact, the portal provides a detail workflow for reviewing and editing customer information.
Depending on the record, this can include fields such as:
* First name
* Last name
* Phone number
* Email
* Address
* Postal code
* Province
* Country
Unsubscribed users [#unsubscribed-users]
The Contacts section also includes an **Unsubscribed Users** subpage showing phone numbers that have been opted out or marked unsubscribed by downstream messaging behavior.
Use this area when documenting consent-sensitive communication workflows.
Sequence enrollment [#sequence-enrollment]
The Contacts view includes an enrollment flow with fields for:
* **Select Sequence**
* **Start Date**
This makes it easy to move a contact directly into an automated outreach sequence without leaving the Contacts section.
Typical workflow [#typical-workflow]
Open
**Contacts**
from the navigation.
Search or scan the table to find the customer you need.
Open the contact or use the top actions to enroll, add, or remove records.
Update the customer's details as needed.
Use sequence enrollment when the contact should enter a follow-up workflow.
Notes [#notes]
* Contacts are dealership-specific.
* The **Unsubscribed** flow is important when documenting consent-sensitive outreach processes.
* Contacts works closely with **Leads**, **Reach**, and **Sequences** in the overall customer journey.
# How to view contact activity (/docs/portal/contacts/view-contact-activity)
Every contact in DealerAI has an activity timeline that shows their complete interaction
history — messages, appointments, sequence enrollments, and vehicle interests. Use this
to understand a customer's journey before engaging with them.
View the activity timeline [#view-the-activity-timeline]
Go to
**Contacts**
from the sidebar.
Find and click the contact you want to review.
Select the
**Activity**
tab in the contact detail view.
Scroll through the timeline to see all recorded interactions.
What the timeline shows [#what-the-timeline-shows]
The activity timeline displays events with icons indicating the type:
| Icon | Activity Type | Example |
| ----------- | ---------------- | ------------------------------------------- |
| Chat bubble | Conversation | "Chat started via Webchat" |
| SMS | Text message | "SMS sent: Follow-up sequence step 2" |
| Email | Email | "Email delivered: Vehicle comparison" |
| Car | Vehicle interest | "User interest in 2024 Honda CR-V detected" |
| Calendar | Appointment | "Test drive booked for Dec 15" |
| List | Sequence | "Enrolled in Follow-Up Sequence" |
Read the timeline effectively [#read-the-timeline-effectively]
* Events are shown in **reverse chronological order** (most recent first).
* Each entry includes a **timestamp** and a brief description of what happened.
* Message delivery statuses are tracked (sent, delivered, failed).
* Vehicle interests are captured automatically when the AI detects a preference.
Use activity for context [#use-activity-for-context]
Before reaching out to a contact, review their activity to:
* See what vehicles they asked about
* Check if they've already been contacted recently (avoid over-messaging)
* Understand which channel they prefer (where they respond most)
* Verify if they have an upcoming appointment
The activity timeline is read-only — it's an audit trail of system events. To add
your own notes to a conversation, use the
[Conversation Notes](/docs/portal/conversations/add-conversation-notes) feature.
Tips [#tips]
* Check activity before manually contacting a customer to avoid duplicating automated
outreach that's already in progress.
* Look at the channel mix — if a customer only ever responds to SMS, don't send email.
* Use vehicle interest entries to personalize your next conversation with specific inventory.
# How to add conversation notes (/docs/portal/conversations/add-conversation-notes)
Conversation notes let staff leave internal context on a chat — things like customer
preferences, follow-up reminders, or handoff instructions. Notes are never shown to
the customer.
Add a note [#add-a-note]
Open
**Conversations**
from the sidebar and select the chat.
Click the
**Notes**
icon in the conversation toolbar to open the notes sidebar.
Type your note in the rich-text editor. You can format text with bold, italic, or bullet lists.
Click
**Save Note**
.
The note is stored against the conversation and visible to any staff member who opens it.
View existing notes [#view-existing-notes]
Open the conversation and click the
**Notes**
icon.
All previously saved notes appear in the sidebar, ordered by most recent first.
When to use notes [#when-to-use-notes]
* Record customer preferences mentioned during chat (e.g., "Only interested in white SUVs").
* Leave handoff instructions when assigning the conversation to another agent.
* Flag conversations that need follow-up ("Call back Monday after test drive").
* Document any commitments made to the customer during a paused/manual interaction.
Notes are internal only. The AI does not read or reference notes in its responses to
customers — they are purely for staff communication.
Tips [#tips]
* Keep notes concise and action-oriented — other staff should understand the context at a glance.
* Use notes alongside the **Assign Agent** feature to give the next handler full context.
# Conversations (/docs/portal/conversations)
The Conversations section is where you can watch AI-led chats happening in real time and step in
to assist or take over when needed. Every inbound message — whether from WebChat, SMS, Facebook,
Instagram, or Google Chat — appears here.
Overview [#overview]
When a customer starts a conversation, DealerAI's AI agents handle the interaction automatically.
The Conversations screen lets your team observe those exchanges, send manual messages, and review
conversation history alongside customer details.
Navigating the Conversations List [#navigating-the-conversations-list]
The left panel shows all active and recent conversations for the selected dealership. Each
conversation card displays:
* Customer name or phone number
* Channel icon (SMS, WebChat, Facebook, etc.)
* Last message preview and timestamp
* Status indicator (active, waiting, resolved)
Use the **dealership selector** at the top to switch between stores if your account has access to
multiple locations.
Conversation Detail [#conversation-detail]
Clicking a conversation opens the full chat view:
* **Message thread** — the complete conversation history between the customer and the AI (or a
staff member)
* **Customer info sidebar** — name, phone, email, channel, and any linked contact record
* **Conversation history** — previous interactions with the same customer
Taking Over a Conversation [#taking-over-a-conversation]
When a staff member sends a message, the AI pauses on that conversation so the human agent is
in full control. The AI resumes when the conversation is resolved or after a configured
inactivity period.
To send a manual message:
Click the conversation you want to join
Type your message in the input box at the bottom of the thread
Press
**Send**
— the message is delivered through the same channel the customer is using
Channel Icons [#channel-icons]
| Icon | Channel |
| -------------- | ------------------------- |
| Chat bubble | WebChat (embedded widget) |
| Phone | SMS |
| Facebook logo | Facebook Messenger |
| Instagram logo | Instagram Direct Message |
| Google logo | Google Chat |
| Envelope | Email |
Filtering and Search [#filtering-and-search]
Use the search bar above the conversation list to find conversations by customer name or phone
number. Conversations are also grouped by status so you can quickly focus on those that need
attention.
Real-Time Updates [#real-time-updates]
The conversation list updates in real time. New messages and status changes appear automatically
without refreshing the page.
# How to pause and resume AI (/docs/portal/conversations/pause-and-resume-ai)
Pausing the AI lets a human agent respond directly to a customer while the bot stays quiet.
When you're finished, resuming the AI hands the conversation back to the bot.
Pause the AI [#pause-the-ai]
Open
**Conversations**
from the sidebar and select the chat you want to handle.
In the conversation toolbar, click
**Pause AI**
.
The conversation status changes to
**Paused**
and the bot stops sending automated replies.
Type your messages directly in the message input and send them as you would normally.
While paused, the AI still observes the conversation and keeps context — it just won't respond
until you resume it.
Resume the AI [#resume-the-ai]
When you're ready to hand control back, click
**Resume AI**
in the toolbar.
The status returns to
**Active**
and the bot continues responding to the customer automatically.
When to pause [#when-to-pause]
* A customer asks a question that requires human judgment (pricing negotiation, escalation).
* You need to provide information the AI doesn't have access to.
* The conversation has become sensitive and needs a personal touch.
Even while paused, the AI continues to capture lead details and conversation context.
When you resume, the bot picks up where it left off with full awareness of what was said.
Tips [#tips]
* Keep paused conversations short — customers expect fast replies once a human takes over.
* If you're going offline, either resume the AI or assign the conversation to another agent.
* You can pause and resume multiple times in the same conversation.
# How to send a lead to CRM (/docs/portal/conversations/send-a-lead-to-crm)
When a conversation contains a qualified lead, you can push the customer's information
directly to your CRM in industry-standard ADF/XML format — without leaving the portal.
Send a lead [#send-a-lead]
Open
**Conversations**
from the sidebar and select the chat containing the lead.
Click the
**Send Lead**
button in the conversation toolbar to open the lead sidebar.
Review and update the pre-filled
**Name**
and
**Email Address**
.
Verify the
**Phone**
number (format: +1 (999) 999-9999).
Select the
**Lead Type**
— Sales, Service, Parts, or other categories.
Click
**Send Lead**
to push the data to your connected CRM.
The system sends the lead in ADF/XML format, which is compatible with all major automotive
CRMs (DealerSocket, VinSolutions, etc.).
What gets sent [#what-gets-sent]
The ADF lead includes:
* Customer contact information (name, phone, email)
* Lead type/category
* Vehicle of interest (if identified during the conversation)
* Source attribution (DealerAI channel and conversation ID)
* Conversation summary context
Prerequisites [#prerequisites]
Your dealership must have a CRM integration configured. If the **Send Lead** button is not
visible, contact your administrator to set up the CRM connection in **Settings**.
The AI can also send leads automatically when it detects a qualified opportunity. Manual
sending is useful when you've had a paused conversation and want to ensure the lead reaches
your CRM with accurate details.
Tips [#tips]
* Verify the phone number and email before sending — the pre-filled data comes from what the
customer provided during chat and may need correction.
* Use the **Lead Type** dropdown to route the lead to the correct department in your CRM.
* You can send a lead from the same conversation multiple times if the customer has multiple
interests (e.g., Sales and Service).
# How to add a holiday (/docs/portal/holidays/add-a-holiday)
Adding a holiday tells the AI not to offer appointments on that date and to set the right
expectations with customers who reach out while you're closed.
Add a holiday [#add-a-holiday]
Go to
**Holidays**
from the sidebar.
Make sure the correct dealership is selected in the top picker.
Click
**Add**
.
Enter a clear
**Holiday Name**
(e.g., "Christmas Day", "Family Day").
Pick the
**Holiday Date**
of the closure.
For each department affected, select the
**Department**
from the dropdown.
Tick
**Closed on this day**
if the department is fully closed, or set opening and closing times for reduced hours.
Optionally add a
**Remarks**
note that the AI can share with customers (e.g., "We reopen January 2nd").
Click
**Add Another Department**
to repeat for additional departments, if needed.
Click
**Create**
.
The new closure appears in the holiday list immediately and takes effect right away.
What changes after adding a holiday [#what-changes-after-adding-a-holiday]
* Appointment booking is **disabled** for that date — the AI won't offer time slots.
* Customers who message during the closure are told you're closed and given the next opening
date if a remark is provided.
* The AI can still take messages and capture lead details for staff to follow up.
Add holidays in advance — ideally for the whole year. The AI uses upcoming closures when
proposing appointment times, so a customer asking on December 20th to book on December 25th
needs the holiday to already be configured.
Tips [#tips]
* Use names a customer would recognize. The AI may reference the name in conversations.
* For a partial-day closure (early close), set the opening and closing times on the department
section rather than ticking **Closed on this day**.
* Long shutdowns (e.g., two-week summer closure) can be added as multiple consecutive holidays.
* To quickly populate common statutory holidays, use the **Auto-fill** button on the Holidays page.
# How to edit or remove a holiday (/docs/portal/holidays/edit-or-remove-a-holiday)
Holidays often need small tweaks: a date change for a moving holiday, an updated remark about
reopening, or removing a one-time closure that has passed.
Edit a holiday [#edit-a-holiday]
Open
**Holidays**
from the sidebar.
Click the holiday row you want to change.
Update any of the fields —
**Holiday Name**
,
**Holiday Date**
, department hours,
**Closed on this day**
, or
**Remarks**
.
Click
**Save**
.
Changes take effect immediately. If the date moved, the AI will update its scheduling
behaviour right away.
Remove a holiday [#remove-a-holiday]
Open
**Holidays**
and click the holiday row you want to remove.
Click
**Delete**
at the bottom-left of the form.
Click
**Confirm**
in the confirmation dialog.
Removing a holiday only affects future dates. Past appointments and conversations that
referenced the closure are unchanged.
When to remove vs. keep [#when-to-remove-vs-keep]
| Situation | Recommended action |
| -------------------------------------------------------- | ------------------------------------------------------------------ |
| One-time closure has passed | **Delete** to keep the list tidy |
| Annual holiday whose date changes (Easter, Thanksgiving) | **Edit** the date each year — don't delete |
| Closure was added by mistake | **Delete** as soon as possible to free up appointment availability |
Bulk removal [#bulk-removal]
To remove multiple holidays at once, tick the checkboxes on the holiday list and click the
**Delete** button in the header toolbar. Enter the number of records to confirm, then click
**Delete**.
Annual cleanup [#annual-cleanup]
Walk through the list once a year and delete any one-time closures that have already passed.
This keeps the holiday view focused on what's coming up.
# Holidays (/docs/portal/holidays)
The Holidays section lets you tell DealerAI about dates when your dealership will be closed or
operating on reduced hours. The AI uses this information to set accurate customer expectations
during conversations — for example, informing a customer enquiring on Christmas Day when the
dealership will next be open.
Overview [#overview]
Without holiday configuration, the AI relies solely on your regular hours from the
[Knowledge Base](/docs/portal/knowledge-base) and [Settings](/docs/portal/settings). Adding
specific closure dates ensures the AI never promises a same-day appointment on a day you're
actually closed.
Holidays List [#holidays-list]
The Holidays page shows a list of all configured closure dates. Each entry includes:
| Field | Description |
| -------------------------- | -------------------------------------------------------------- |
| **Date** | The specific date the dealership is closed |
| **Holiday** | A label for the holiday (e.g., "Christmas Day", "Labour Day") |
| **Affected Department(s)** | Which departments are closed or on reduced hours for that date |
Adding a Holiday [#adding-a-holiday]
Click
**Add**
on the Holidays page
Enter the
**Holiday Name**
Select the
**Holiday Date**
from the date picker
Select the affected
**Department(s)**
and configure closure hours or tick
**Closed on this day**
Optionally add
**Remarks**
— the AI may include this in responses (e.g., the next available date)
Click
**Create**
Editing and Removing Holidays [#editing-and-removing-holidays]
Click any holiday entry to edit or delete it. If a one-time closure has passed, you can safely
delete it to keep the list current — or leave it if it recurs annually.
How the AI Uses Holiday Data [#how-the-ai-uses-holiday-data]
When a customer contacts the dealership during a configured holiday:
* The AI informs them that the dealership is currently closed
* If a note is provided, the AI shares the expected reopening date
* The AI can still take a message or capture the customer's details so staff can follow up when
the dealership reopens
Appointment booking is automatically disabled for holiday dates. The AI will not offer
appointment slots on days marked as closures.
Recommended Holidays to Configure [#recommended-holidays-to-configure]
Set up closures for any date your dealership will be fully or partially closed:
* National statutory holidays (New Year's Day, Canada Day, Christmas, etc.)
* Long weekend closures
* Staff training days
* Inventory days or annual shutdowns
# How to set recurring holidays (/docs/portal/holidays/set-recurring-holidays)
Most statutory holidays fall on the same date every year — Christmas, New Year's Day, Canada
Day. DealerAI doesn't have a recurring checkbox, but it handles annual holidays intelligently:
if you add a holiday with the same name as a past-year entry that has already passed, the
system automatically updates that entry with the new date rather than creating a duplicate.
Add an annual holiday [#add-an-annual-holiday]
Open
**Holidays**
and click
**Add**
.
Enter the
**Holiday Name**
(e.g., "New Year's Day"). Use the exact same name each year.
Pick the
**Holiday Date**
for the current or upcoming year.
Set up the affected departments — select each
**Department**
, tick
**Closed on this day**
, and add a
**Remarks**
note if useful (e.g., "We reopen the next business day").
Click
**Create**
.
The holiday applies immediately. Next year, repeat with the same name and the new date —
DealerAI will update the existing entry automatically.
Convert an existing holiday to use the same name next year [#convert-an-existing-holiday-to-use-the-same-name-next-year]
Click the holiday in the list.
Update the
**Holiday Date**
to the new year's date.
Click
**Save**
.
Holidays that move each year [#holidays-that-move-each-year]
Some holidays — Easter, Thanksgiving in some regions, Victoria Day, Labour Day — change date
each year. Add these fresh each year with the same name and the new date.
A good time to review and add the year's moving holidays is right after the New Year. Block
off 5 minutes to add Easter, Thanksgiving, and any long-weekend dates for the next 12 months.
Use Auto-fill for common holidays [#use-auto-fill-for-common-holidays]
The **Auto-fill** button on the Holidays page automatically populates common statutory holidays
for your region. This is the fastest way to set up a full year of standard closures at once.
Recommended holidays to add each year [#recommended-holidays-to-add-each-year]
These fixed-date holidays are safe to re-add annually with the same name:
| Holiday | Date |
| ----------------------------- | --------------- |
| New Year's Day | January 1 |
| Canada Day / Independence Day | July 1 / July 4 |
| Christmas Eve | December 24 |
| Christmas Day | December 25 |
| Boxing Day | December 26 |
| New Year's Eve | December 31 |
Add any others your dealership traditionally observes — anniversaries, founder days, or annual
inventory days.
# Inventory (/docs/portal/inventory)
The **Inventory** section is the portal workspace for dealership vehicle inventory.
Inventory overview [#inventory-overview]
The current Inventory page shows separate sections for:
* **New Cars**
* **Used Cars**
The header also displays summary counts for the currently visible new and used inventory.
Inventory detail view [#inventory-detail-view]
When a vehicle is selected, the portal opens a detail workflow so users can inspect an individual unit more closely without losing the broader inventory context.
What users can do [#what-users-can-do]
From the Inventory page, dealership staff can:
* Review visible inventory counts
* Browse vehicle cards in the current result set
* Switch through paginated new and used inventory lists
* Open a vehicle to inspect more details
The list presents each vehicle as a quick summary card, typically including price, store label, model year, make and model, and trim.
Typical workflow [#typical-workflow]
Open
**Inventory**
from the navigation.
Review the visible new and used counts in the header.
Browse the current vehicle cards or page through additional results.
Open a vehicle when you need to inspect its details more closely.
Confirm the inventory shown here matches the dealership's expected live stock.
Notes [#notes]
* Inventory is dealership-specific.
* The page is split between new and used listings rather than a single undifferentiated list.
* Inventory documentation pairs well with **Promotions** and **Knowledge Base** when describing how DealerAI answers vehicle questions.
# How to add a fact to the Knowledge Base (/docs/portal/knowledge-base/add-a-fact)
The Knowledge Base is the AI's source of truth for dealership-specific information — financing
options, warranty terms, loaner policies, directions, and anything else customers commonly ask
about.
Add a fact [#add-a-fact]
Go to
**Knowledge Base**
from the sidebar.
Confirm the correct dealership is selected.
Use the
**Table of Contents**
sidebar to navigate to the section that best fits the new fact (for example,
*Financing*
,
*Service*
,
*Policies*
).
Edit the section's content and add the new fact as its own paragraph or descriptor entry.
Click
**Save**
at the top of the page.
Click
**Train AI**
to make the change available to live conversations. (See
[How to retrain the AI](/docs/portal/knowledge-base/retrain-the-ai)
.)
What makes a good knowledge entry [#what-makes-a-good-knowledge-entry]
| Do | Avoid |
| -------------------------------------------------------- | ------------------------------------------------------------- |
| Keep each fact short and self-contained (1–3 sentences). | Long marketing copy or generic blurbs. |
| Use plain language a customer would understand. | Internal jargon and acronyms with no explanation. |
| State numbers, names, and conditions explicitly. | Vague phrases like "competitive rates" or "industry-leading". |
| Mention the dealership by name where relevant. | Copying competitor language wholesale. |
Treat the Knowledge Base like an FAQ written for the AI. The clearer and more specific each
entry, the more accurately the AI can use it in real conversations.
Examples of useful facts to add [#examples-of-useful-facts-to-add]
* "Financing applications are processed in-house and most decisions are returned the same day."
* "Service loaners are available for repairs expected to take longer than 4 hours, subject to
availability."
* "We offer a 30-day exchange policy on certified pre-owned vehicles."
* "Our service department is located at the rear of the building — enter from Maple Street."
Next step [#next-step]
After adding facts, [retrain the AI](/docs/portal/knowledge-base/retrain-the-ai) and
[test that the AI uses the new knowledge](/docs/portal/knowledge-base/test-ai-knowledge).
# How to extract knowledge from your website (/docs/portal/knowledge-base/extract-from-website)
The **Extract** tool inside the Knowledge Base pulls content from any page on your dealership
website (or another source URL) and turns it into structured knowledge entries you can review,
edit, and train.
This is the fastest way to seed a new dealership's Knowledge Base or refresh facts after a
website overhaul.
Run an extract [#run-an-extract]
Open
**Knowledge Base**
and click
**Scrape**
in the page header.
Confirm the correct dealership is selected.
Paste the
**URL**
of the page you want to extract (e.g., your About, Financing, or Service page).
Click
**Extract**
.
Wait for the extraction to finish — large pages may take a minute.
Review the proposed knowledge entries on screen.
Edit, accept, or discard each entry.
Click
**Save**
to merge accepted entries into the Knowledge Base.
Click
**Train AI**
so the new content is used in live conversations.
What to extract [#what-to-extract]
| Page type | Why it's useful |
| ---------------------------------- | ------------------------------------------------------------------------- |
| **About / Contact** | Address, hours, departments, history |
| **Financing** | Programs, partners, application steps |
| **Service** | Hours, loaner policy, drop-off process |
| **Warranty / Certified Pre-Owned** | Coverage terms, eligibility |
| **Specials / Offers** | Use [Promotions](/docs/portal/promotions) instead for time-limited offers |
| **Directions** | Landmarks and entry instructions |
Review carefully [#review-carefully]
Extraction is automatic and can pick up marketing copy or stale dates. Always:
* **Read every proposed entry** before saving.
* **Trim** anything that's promotional fluff rather than a fact.
* **Update** dates, names, and prices that may have changed since the page was published.
* **Reject** anything that contradicts other Knowledge Base entries.
Extract is best for the **first pass** of populating knowledge. After that, maintain the
Knowledge Base directly using the [Add a fact](/docs/portal/knowledge-base/add-a-fact)
workflow rather than re-extracting, to avoid overwriting your edits.
Re-extracting a page [#re-extracting-a-page]
When a website page changes substantially (e.g., a redesigned Financing page):
Re-run
**Extract**
on the URL.
Compare the proposed entries to your existing Knowledge Base.
Accept only the entries that genuinely add or update information.
Save and
**Train AI**
.
# Knowledge Base (/docs/portal/knowledge-base)
The **Knowledge Base** section is where dealership-specific reference content is maintained for DealerAI.
Knowledge editor [#knowledge-editor]
The current Knowledge Base experience includes:
* A page header showing the number of knowledge bases and training status
* Top actions for **Save**, **Train AI**, and **Cancel**
* A **Table of Contents** sidebar
* A structured content editor for dealership knowledge entries
This is the central place for editing the facts and reference material DealerAI relies on during conversations.
Extract workflow [#extract-workflow]
The Knowledge Base also includes an **Extract** subpage for pulling site content from a URL.
Use this when you want to seed or refresh dealership facts from an existing website before reviewing and saving the results.
Structured knowledge editing [#structured-knowledge-editing]
Knowledge Base content is maintained in structured entries rather than one large freeform document.
The editor supports workflows such as:
* Updating descriptors or labels
* Editing long-form paragraph content
* Moving between knowledge sections from the sidebar
* Saving or canceling pending changes
Typical workflow [#typical-workflow]
Open
**Knowledge Base**
from the navigation.
Select the dealership you want to manage.
Use the
**Table of Contents**
to jump to the section you want to edit.
Update the structured knowledge entries.
Click
**Save**
, then use
**Train AI**
if the changes should affect production responses.
Notes [#notes]
* Knowledge Base is dealership-specific.
* This section is a major source of truth for customer-facing AI answers.
* Changes here often work best when coordinated with updates in **Agents**, **Reach**, or **Settings**.
# How to organize the Knowledge Base by topic (/docs/portal/knowledge-base/organize-by-topic)
A well-organized Knowledge Base is easier to keep current and helps the AI find the right
content during conversations. Use the **Table of Contents** sidebar as your map, and group
related facts into the same section.
Use the Table of Contents [#use-the-table-of-contents]
The Table of Contents on the left of the Knowledge Base editor is your navigation across
sections. Each section holds the facts for one topic.
Typical sections include:
| Section | What goes here |
| -------------------- | --------------------------------------------------- |
| **About** | Dealership history, ownership, brands sold |
| **Hours & Location** | Departments, address, parking, directions |
| **Sales** | Process, test drives, trade-ins, pricing approach |
| **Financing** | Programs, partners, application steps |
| **Service** | Booking, loaners, drop-off/pick-up, recall handling |
| **Parts** | Ordering, special orders, returns |
| **Warranty / CPO** | Coverage, eligibility, claims |
| **Policies** | Returns, deposits, cancellations |
If a topic doesn't fit anywhere, add it to **About** or request a new section from your
DealerAI onboarder.
Move an entry to a different section [#move-an-entry-to-a-different-section]
Open the section currently holding the entry.
Copy the entry's text.
Delete the entry from its current section and click
**Save**
.
Navigate to the destination section in the Table of Contents.
Paste the entry, edit as needed, and click
**Save**
.
Click
**Train AI**
when you're done reorganizing.
Best practices for organization [#best-practices-for-organization]
* **One fact per entry.** Avoid combining "We offer financing **and** we have loaners" into a
single entry — split them so each can be matched independently.
* **Keep related facts together.** All financing facts in *Financing*, all service facts in
*Service*. The AI has an easier time when context is consistent within a section.
* **Avoid duplicates.** If two sections both describe the same policy, the AI may give
inconsistent answers. Keep one canonical entry and reference it from the other if needed.
* **Use customer-friendly section names.** The section names aren't shown to customers, but
using clear names helps your team maintain the content.
Treat the Knowledge Base like a help center for your AI. The same principles that make a
human-facing FAQ effective — clear topics, short answers, no duplicates — apply here.
Periodic review [#periodic-review]
Schedule a quarterly review of the Knowledge Base:
Walk through each section in the Table of Contents.
Remove entries that are no longer accurate.
Update any prices, names, or dates that have changed.
Look for duplicates between sections and consolidate.
Save and
**Train AI**
at the end of the review.
A 30-minute review every quarter keeps the Knowledge Base trustworthy and prevents the AI from
giving stale answers.
# How to retrain the AI after Knowledge Base updates (/docs/portal/knowledge-base/retrain-the-ai)
Saving Knowledge Base edits stores your changes, but the AI only picks them up after you
**Train AI**. This is a deliberate two-step process so you can stage multiple edits and push
them all at once.
Train the AI [#train-the-ai]
Open
**Knowledge Base**
and confirm the correct dealership is selected.
Make and
**Save**
all the changes you want to publish.
Click
**Train AI**
at the top of the page.
Wait for the training status to show as complete (typically under a minute).
Once training finishes, the next conversation the AI handles will draw on the updated content.
When you need to retrain [#when-you-need-to-retrain]
Retrain after any of these changes:
* Adding, editing, or removing a Knowledge Base fact
* Importing entries via the **Extract** workflow
* Bulk reorganizing sections in the Table of Contents
You **don't** need to retrain after changing:
* Settings (hours, address, channels)
* Inventory (vehicles refresh automatically from your feed)
* Promotions (have their own retrain step under Promotions)
Confirm the new knowledge is live [#confirm-the-new-knowledge-is-live]
After training, [test the AI's knowledge](/docs/portal/knowledge-base/test-ai-knowledge) by
opening the [Preview](/docs/portal/preview) tool and asking a question that should use the new
content.
If the AI still gives the old answer after training, hard-refresh the Preview window. If the
answer remains stale, double-check that you saved before clicking Train AI — unsaved edits
are not included in training.
Training status indicators [#training-status-indicators]
The page header shows the current training state:
| Status | Meaning |
| ------------------- | ------------------------------------------------------------------------------ |
| **Up to date** | The live AI is using the latest saved Knowledge Base. |
| **Pending changes** | You have saved edits that haven't been trained yet. |
| **Training…** | A train job is running; new conversations may briefly mix old and new answers. |
| **Failed** | Training didn't complete. Try again, and contact support if it persists. |
A good rhythm [#a-good-rhythm]
* **Daily edits**: Save as you go, then Train AI once at the end of the editing session.
* **Major rewrites**: Save in stages, but only Train AI after the full rewrite is reviewed.
* **Avoid** training many times in quick succession — batch your edits instead.
# How to test that the AI uses your latest knowledge (/docs/portal/knowledge-base/test-ai-knowledge)
After [retraining the AI](/docs/portal/knowledge-base/retrain-the-ai), confirm the new content
is being used correctly by asking the AI directly in a safe, non-customer environment.
Test in Preview [#test-in-preview]
The fastest way to test is the **Preview** tool, which gives you a live webchat session against
your real AI configuration without affecting your dealership's analytics.
Open
**Preview**
from the sidebar.
Confirm the correct dealership is selected.
Start a chat and ask a question that should use the new knowledge entry.
Read the AI's response and confirm it reflects what you wrote.
Try a few rephrasings of the same question to make sure the AI matches the entry consistently.
What to look for [#what-to-look-for]
| Check | Why |
| ------------------------------------------------------- | ------------------------------------------------------------------ |
| The answer **mentions** the new fact | Confirms the entry is reachable. |
| The answer is **accurate** | Confirms the entry was understood, not paraphrased incorrectly. |
| The answer is **brief and conversational** | Long answers often mean the source entry is too verbose — trim it. |
| The AI doesn't **contradict** itself in follow-up turns | Indicates a clean entry without conflicting older content. |
Example test prompts [#example-test-prompts]
If you added a fact about loaner cars:
* "Do you offer loaner vehicles?"
* "Can I get a courtesy car while my car is being serviced?"
* "What's the loaner policy?"
The AI should respond consistently across all three phrasings.
Always test with **at least three different phrasings** of the same question. Customers
rarely ask the way you'd expect.
When the AI gives a wrong or stale answer [#when-the-ai-gives-a-wrong-or-stale-answer]
1. **Confirm you trained.** Re-open Knowledge Base and check the training status reads "Up to
date".
2. **Check for conflicting entries.** Search the Knowledge Base for older facts that contradict
the new one and remove or update them.
3. **Tighten the entry.** Make the wording more direct and specific — the AI matches concrete
statements better than vague ones.
4. **Save and retrain**, then re-test in Preview.
Test on the channel customers use [#test-on-the-channel-customers-use]
After Preview looks good, also test in the channel(s) you actually serve:
* Send a test SMS from your own phone to the dealership number.
* Email the dealership address from a personal email.
* Open the live webchat widget on a staging copy of your website.
This catches channel-specific quirks that Preview can't always reproduce.
# Leads (/docs/portal/leads)
The **Leads** section is the dealership lead-review workspace in the DealerAI portal.
Leads list [#leads-list]
The current Leads page shows:
* A **Start Date** picker
* An **End Date** picker
* A dealership-scoped leads table
* A sequence-enrollment panel beneath the table
The visible lead columns include:
* **Name**
* **Phone**
* **Email**
* **Date/Time**
* **Type**
* **Channel**
Sequence panel [#sequence-panel]
The lower section of the page includes quick sequence controls such as:
* **Select Sequence**
* **Start Date**
This supports immediate handoff into automated outreach when a lead should continue through Reach or Sequences.
Working a lead [#working-a-lead]
From the Leads section, dealership staff can:
* Narrow the list by a date range
* Review the recent leads in the selected window
* Inspect how the lead entered the system
* Use the sequence panel to place the lead into a follow-up workflow
Typical workflow [#typical-workflow]
Open
**Leads**
from the navigation.
Set the
**Start Date**
and
**End Date**
for the period you want to review.
Inspect the table for lead type, channel, and timing.
Open the related conversation or customer record when more context is needed.
Use sequence enrollment when the lead should move into follow-up.
Notes [#notes]
* Leads is dealership-specific.
* This page is optimized for reviewing and triaging recent lead activity.
* Pair this page with **Reach** and **Contacts** documentation when describing a complete lead-management workflow.
# Organizations (/docs/portal/organizations)
The Organizations section provides administrative control over the multi-location structure of
your DealerAI account. It is used by organization administrators to manage stores (individual
dealership locations) and the staff members who have access to each one.
The Organizations section is only visible to users with the **Admin** or **Org Admin** role.
Standard dealership users do not see this section.
Overview [#overview]
DealerAI supports multi-tenant organizations — a single organization can manage multiple
dealership stores. The Organizations section is the control centre for that structure.
| Area | Purpose |
| ---------- | ------------------------------------------------------------------------ |
| **Stores** | View and configure all dealership locations in the organization |
| **Staff** | Manage the people who have access to the portal and their assigned roles |
Stores [#stores]
The Stores page lists every dealership location belonging to your organization.
Stores List [#stores-list]
Each row in the stores table shows:
| Column | Description |
| -------------- | ------------------------------------------- |
| **Store name** | The display name of the dealership location |
| **Location** | City or address |
| **Status** | Active or inactive |
| **Users** | Number of staff assigned to this store |
Store Detail [#store-detail]
Click any store to open its detail view, which includes several tabs:
| Tab | Contents |
| ----------------- | ------------------------------------------------------------- |
| **Details** | Name, address, timezone, and other store metadata |
| **Users** | Staff members who have access to this store, with their roles |
| **Manufacturers** | Vehicle brands sold by this store |
| **Configuration** | Advanced NLP and platform-specific settings |
Adding a New Store [#adding-a-new-store]
Go to
**Organizations → Stores**
and click
**Add Store**
Enter the store name, address, and timezone
Select the manufacturers the store sells
Click
**Save**
— the new store is created and can now be configured fully
Assigning Users to a Store [#assigning-users-to-a-store]
Open the store in the stores list
Navigate to the
**Users**
tab
Click
**Add User**
and search for the staff member by name or email
Select their
**Role**
(Admin, Org Admin, or User) for this store
Click
**Save**
Staff [#staff]
The Staff page manages the professional profiles of everyone who has access to your organization's
portal.
Staff List [#staff-list]
The staff list shows all personnel in the organization:
| Column | Description |
| ---------- | ----------------------------------------------- |
| **Name** | Staff member's full name |
| **Email** | Login email address |
| **Role** | Organization-level role |
| **Stores** | Number of stores the staff member has access to |
Use the search bar to filter staff by name or email.
Staff Profile [#staff-profile]
Click any staff member to view their profile:
* Full name, email, and profile photo (via Gravatar)
* Assigned stores and roles
* Account status
Adding a Staff Member [#adding-a-staff-member]
Click
**Add Staff**
from the staff list
Enter the staff member's name and email address
Assign an organization-level role
Click
**Save**
— the staff member receives an email invitation to set their password
Editing and Removing Staff [#editing-and-removing-staff]
Open a staff profile and click **Edit** to update their details. To remove a staff member from
the organization, open their profile and use the **Remove** option. This revokes all portal
access immediately.
Removing a staff member from the organization removes their access to all stores and cannot be
undone without re-inviting them.
# Preview (/docs/portal/preview)
The Preview section gives you a sandboxed environment to interact with your DealerAI webchat
widget exactly as your website visitors will experience it — before making any changes live on
your site.
Overview [#overview]
Preview renders a simulation of your dealership's website with the chat widget overlaid on top.
You can open the widget, send test messages, and see how the AI responds using your current
configuration, agent prompts, inventory, and Knowledge Base.
Conversations started in Preview are test conversations. They do not create real leads, book
actual appointments, or trigger Reach sequences.
Using Preview [#using-preview]
Navigate to
**Preview**
in the sidebar and select your dealership
The preview frame loads showing a simulated dealership page with the chat widget in the corner
Click the widget button to open the chat window
Type a message as if you were a customer — for example, "Do you have any trucks under $50,000?"
Observe how the AI responds using your current inventory, prompts, and settings
What to Test [#what-to-test]
Use Preview to verify the experience before going live or after making configuration changes:
| What to check | How |
| ----------------------- | ------------------------------------------------------------------- |
| **Greeting message** | Open the widget and check the first message displayed |
| **Widget appearance** | Confirm the colours, logo, and title match your branding |
| **Inventory accuracy** | Ask about specific vehicles and check the AI uses up-to-date stock |
| **Knowledge Base** | Ask about hours, location, or policies and verify the answers |
| **Promotions** | Ask about current deals and confirm active promotions are mentioned |
| **Appointment booking** | Go through a full booking flow to test the end-to-end experience |
After Testing [#after-testing]
If you find issues in Preview:
* **Incorrect AI responses** — update the relevant agent prompt in [Agents](/docs/portal/agents)
* **Wrong dealership info** — update [Knowledge Base](/docs/portal/knowledge-base) or [Settings](/docs/portal/settings)
* **Missing or wrong vehicles** — review the [Inventory](/docs/portal/inventory) list
* **Widget appearance issues** — adjust the Webchat settings in [Settings → Webchat](/docs/portal/settings)
Re-open Preview after each change to confirm the issue is resolved before going live.
# How to create a promotion (/docs/portal/promotions/create-a-promotion)
Promotions are time-bound special offers your dealership wants to advertise. Once created,
the AI can mention these promotions in conversations when relevant — for example, when a
customer asks about deals on a specific model.
Create a promotion [#create-a-promotion]
Go to
**Promotions**
from the sidebar.
Click
**Add**
.
Enter a
**Promotion Name**
— a clear, customer-facing title (e.g., "Spring Clearance on 2024 Trucks").
Write a
**Promotion Description**
with the full offer details using the rich-text editor.
Add a
**Site URL**
linking to the promotion page on your website (optional).
Add
**Tags**
— keywords the AI uses to match the promotion to relevant conversations (e.g., "truck", "financing", "lease").
Set the
**Start Date**
and
**End Date**
for when the promotion is active.
Click
**Create**
to save the promotion.
The promotion appears in your list immediately. To make it available to the AI, you'll
also need to [train the AI](/docs/portal/promotions/train-ai-on-promotions).
What customers see [#what-customers-see]
The AI doesn't read promotions verbatim to customers. Instead, it uses the promotion
details to naturally incorporate offers into conversations. For example:
> Customer: "Do you have any deals on trucks right now?"
> AI: "Yes! We have a spring clearance event on 2024 trucks with up to $5,000 off MSRP.
> Would you like me to show you what's available?"
Promotion lifecycle [#promotion-lifecycle]
| Status | Meaning |
| -------- | -------------------------------------------------------- |
| Active | Between start and end date — AI can reference it |
| Upcoming | Before start date — visible in portal but not used by AI |
| Expired | Past end date — AI stops referencing it |
After creating a promotion, remember to click **Train AI** to sync it into the bot's
knowledge base. The AI won't know about new promotions until it's been trained.
Tips [#tips]
* Write descriptions from the customer's perspective — focus on the value, not internal codes.
* Use specific tags so the AI matches promotions to the right conversations.
* Set end dates accurately — the AI will stop mentioning expired promotions automatically.
* Link to your website so the AI can direct interested customers to full details.
# How to edit or deactivate a promotion (/docs/portal/promotions/edit-or-deactivate-a-promotion)
Promotions can be updated at any time — whether you need to extend a deadline, update the
offer details, or temporarily deactivate a promotion without deleting it.
Edit a promotion [#edit-a-promotion]
Go to
**Promotions**
from the sidebar.
Click the promotion you want to modify.
Update the
**Promotion Name**
and
**Promotion Description**
as needed.
Add or remove
**Tags**
to adjust how the AI matches the promotion.
Update the
**Site URL**
or
**Start/End Dates**
if applicable.
Click
**Save**
.
Click
**Train AI**
to sync the updated information to the bot's knowledge base.
Deactivate a promotion [#deactivate-a-promotion]
To stop the AI from referencing a promotion without deleting it:
Open the promotion from the list.
Toggle the
**Active**
status to
**Off**
.
Save the change.
Click
**Train AI**
to update the bot's knowledge.
Deactivated promotions remain in your list for reference but the AI will not mention them
in conversations.
Reactivate a promotion [#reactivate-a-promotion]
Open the deactivated promotion.
Toggle the
**Active**
status back to
**On**
.
Verify the dates are still valid (update if needed).
Save and
**Train AI**
.
Always click **Train AI** after making changes. The bot uses a cached version of your
promotions — edits don't take effect until you retrain.
When to deactivate vs. delete [#when-to-deactivate-vs-delete]
* **Deactivate** — when the promotion might return (seasonal offers, recurring events)
* **Delete** — when the promotion is permanently retired and you want a cleaner list
Tips [#tips]
* After extending a promotion's end date, train the AI so it stops telling customers the
offer has expired.
* Use deactivation for flash sales — toggle on/off quickly without re-entering all details.
* Review expired promotions monthly and clean up ones you won't reuse.
# How to extract promotions from a URL (/docs/portal/promotions/extract-promotions-from-url)
If your dealership's promotions are already listed on a webpage, you can extract them
automatically instead of typing each one manually. The extraction tool scans the page
and pulls in promotion titles, descriptions, and details.
Extract promotions from a URL [#extract-promotions-from-a-url]
The **Extract Promotions** feature is available to administrators only.
Go to
**Promotions**
from the sidebar.
Click
**Extract Promotions**
in the page header.
Paste the
**URL**
of the webpage containing your promotions (e.g., your dealership's specials page).
Click
**Extract**
to scan the page.
Review the extracted promotions — the system shows what it found, including titles and descriptions.
Edit any extracted details that need correction or enhancement.
Click
**Save**
to add the promotions to your list.
What gets extracted [#what-gets-extracted]
The tool attempts to identify:
* Promotion titles/headlines
* Offer descriptions and terms
* Associated images
* Relevant dates (if visible on the page)
After extraction [#after-extraction]
Once promotions are saved, complete the setup:
Review each extracted promotion and add
**Tags**
for AI matching.
Set
**Start**
and
**End Dates**
if they weren't detected from the page.
Click
**Train AI**
to sync the new promotions into the bot's knowledge base.
Extraction works best on well-structured pages with clear headings and offer sections.
Complex layouts with heavy JavaScript rendering may not extract completely — review
results and fill in any gaps manually.
When to use extraction [#when-to-use-extraction]
* Initial setup — quickly import all current specials from your existing website
* Monthly refresh — re-extract from your specials page after your marketing team updates it
* Multi-location — pull promotions from manufacturer or group-level pages
Tips [#tips]
* Use your dealership's own specials/offers page for the most accurate extraction.
* Always review extracted content — the tool may pick up navigation text or footers.
* Add tags manually after extraction to improve the AI's ability to match promotions to
customer interests.
* Re-extract periodically to catch new offers added by your marketing team.
# Promotions (/docs/portal/promotions)
The **Promotions** section is where dealership-specific offers and specials are managed in the portal.
Promotions list [#promotions-list]
The current Promotions page includes:
* A header showing the total number of promotions and training status
* Top actions for **Train AI**, **Add**, and **Delete**
* Table tools for **Filters** and **Columns**
* A dealership-scoped promotions table
The visible table columns include:
* **Promotion Name**
* **Active**
* **Tags**
* **Start Date**
* **End Date**
Extract promotions [#extract-promotions]
The Promotions area also includes an **Extract Promotions** workflow where users can supply a URL and pull promotional content into the portal for review.
This is useful when a dealership already publishes offers elsewhere and wants to bring them into DealerAI more efficiently.
Main actions [#main-actions]
Train AI [#train-ai]
Use **Train AI** after changing promotional content so DealerAI reflects the latest offers in live conversations.
Add [#add]
Create a new promotion record.
Delete [#delete]
Remove one or more selected promotions when they are no longer valid.
Typical workflow [#typical-workflow]
Open
**Promotions**
from the navigation.
Review the current promotions list and filter it if needed.
Add a new offer, edit an existing one, or use the extract flow.
Confirm the active window, tags, and content are correct.
Save the changes and click
**Train AI**
if the update should affect production responses.
Notes [#notes]
* Promotions is dealership-specific.
* Training matters here because promotional content often needs to show up in customer-facing answers quickly.
* Pair this page with **Inventory** and **Knowledge Base** docs when documenting merchandising or campaign workflows.
# How to train AI on promotions (/docs/portal/promotions/train-ai-on-promotions)
After creating or updating promotions, you need to train the AI so it knows about the
current offers. Until you train, the bot uses its previous knowledge and won't reference
new or updated promotions.
Train the AI [#train-the-ai]
Go to
**Promotions**
from the sidebar.
Click the
**Train AI**
button (typically at the top of the promotions list).
Wait for the training to complete — this usually takes a few seconds.
A confirmation message appears when the bot's knowledge base has been updated.
When to train [#when-to-train]
Train the AI whenever you:
* Create a new promotion
* Edit an existing promotion's details
* Deactivate or reactivate a promotion
* Delete a promotion
* Change promotion dates or tags
What training does [#what-training-does]
The training process:
1. Collects all **active** promotions with valid dates
2. Formats them into the AI's knowledge base
3. Updates the bot so it can reference current offers in conversations
4. Removes expired or deactivated promotions from the bot's active knowledge
How the AI uses promotions [#how-the-ai-uses-promotions]
After training, the AI can:
* Mention relevant promotions when customers ask about deals
* Reference specific offer details (discounts, eligibility, dates)
* Direct customers to the promotion URL for full details
* Avoid mentioning expired or deactivated offers
Training is fast and non-disruptive — active conversations continue without interruption.
The updated knowledge takes effect on the next message the bot sends.
Tips [#tips]
* Make training part of your workflow: create/edit → save → train. Don't skip the last step.
* If the AI mentions an outdated promotion, it likely needs retraining.
* Train after bulk changes (e.g., end-of-month cleanup) rather than after each individual edit
to save time.
* Use **Preview** to verify the bot correctly references your promotions after training.
# How to configure email settings (/docs/portal/reach/configure-email-settings)
Email settings control how DealerAI sends and receives email messages through Reach.
Configuring these properly ensures emails come from your dealership's domain and include
professional branding.
Configure outbound email [#configure-outbound-email]
Go to
**Reach**
from the sidebar.
Navigate to the email settings section (within General Configuration or a dedicated Email tab).
Set the
**Sender Email**
— the "from" address customers see (e.g.,
[sales@yourdealership.com](mailto:sales@yourdealership.com)
).
Set the
**Domain**
— your verified sending domain.
Add
**BCC Emails**
— addresses that receive a copy of every outbound message (useful for CRM integration or compliance).
Click
**Save**
.
Configure the email signature [#configure-the-email-signature]
In the email settings, locate the
**Email Signature**
editor.
Use the rich-text editor to write your signature — include staff name or department, dealership name and address, phone number, website URL, and optionally a logo.
Preview the signature to ensure it displays correctly.
Click
**Save**
.
The signature is automatically appended to all outbound emails sent through Reach.
Configure inbound email [#configure-inbound-email]
Set the
**Inbound Email Address**
— where the system receives incoming email replies and ADF leads.
Ensure your email forwarding rules (SendGrid or mail server) route messages to this address.
Save your configuration.
Email domain verification [#email-domain-verification]
For deliverability, your sending domain needs to be verified:
* DNS records (SPF, DKIM, DMARC) must be configured for your domain
* Contact your administrator or IT team to set up these records
* Unverified domains may have emails rejected or marked as spam
Email settings apply to all Reach sequences that use the email channel. Changes here
affect follow-up emails, inbound responses, and re-engagement messages.
Tips [#tips]
* Use a recognizable sender address — customers are more likely to open emails from
"[sales@dealership.com](mailto:sales@dealership.com)" than a generic address.
* Keep signatures concise on mobile — long signatures push the actual message content down.
* Add your BCC address to ensure all outbound communication is logged in your CRM.
* Test email delivery by sending to an internal address before activating Reach campaigns.
# How to configure inbound sequences (/docs/portal/reach/configure-inbound-sequences)
Inbound sequences define how DealerAI responds when new leads arrive from external
sources — dealer websites, AutoTrader, Cars.com, and other ADF-compatible providers.
Each provider can be mapped to a specific response sequence.
Configure an inbound sequence [#configure-an-inbound-sequence]
Go to
**Reach**
from the sidebar.
Select the
**Inbound Sequences**
tab.
Click
**Add Sequence**
to create a new inbound rule.
Select the
**Provider**
— the source of the incoming lead (e.g., AutoTrader, Cars.com, Website).
Choose the
**Channel**
— how the system should respond (SMS, Email, or both).
Configure the
**Response Timing**
— how quickly the first message goes out.
Click
**Save**
.
How inbound sequences work [#how-inbound-sequences-work]
1. A lead arrives via ADF/XML (email) or web form submission.
2. The system identifies the source provider from the ADF data.
3. The matching inbound sequence is triggered.
4. The AI sends the first response via the configured channel.
5. If the customer replies, a live conversation begins and the AI continues naturally.
Map multiple providers [#map-multiple-providers]
Different lead sources may need different response strategies:
| Provider | Response Channel | Timing | Rationale |
| ---------- | ---------------- | --------- | ------------------------------------- |
| AutoTrader | SMS | 2 minutes | Fast response for comparison shoppers |
| Website | SMS + Email | 5 minutes | Multi-channel for owned traffic |
| Cars.com | SMS | 2 minutes | Competitive market, speed matters |
Leads without a matching provider rule use the **default** inbound sequence. Make sure
you have a default configured to catch leads from new or unexpected sources.
Tips [#tips]
* Speed is critical — leads contacted within 5 minutes are far more likely to convert.
* Match the response channel to where the customer originally engaged when possible.
* Review unmatched leads periodically and add provider rules for any recurring sources.
* Coordinate with [Follow-Up sequences](/docs/portal/reach/set-up-follow-up-sequences) for
what happens after the initial inbound response.
# How to configure re-engagement (/docs/portal/reach/configure-re-engagement)
Re-engagement campaigns contact leads who have gone silent after an initial interaction.
When a customer stops responding, the system waits a configured period and then sends a
follow-up to re-open the conversation.
Set up re-engagement [#set-up-re-engagement]
Go to
**Reach**
from the sidebar.
Select the
**Re-Engagement**
tab.
Toggle re-engagement
**On**
to activate the feature.
Configure the
**Inactivity Period**
— how long to wait after the customer's last message before re-engaging (e.g., 3 days, 1 week).
Set the
**Channel**
— SMS, Email, or both.
Click
**Save**
.
How re-engagement works [#how-re-engagement-works]
1. A customer has an initial conversation but stops responding.
2. The system monitors for the configured inactivity period.
3. After the period expires, the AI sends a re-engagement message.
4. If the customer replies, a new live conversation begins.
5. If the customer doesn't reply, no further messages are sent (respecting their silence).
Re-engagement vs. follow-up [#re-engagement-vs-follow-up]
| Feature | Follow-Up | Re-Engagement |
| --------- | --------------------------------- | ------------------------------- |
| Trigger | After initial contact | After customer goes silent |
| Timing | Fixed schedule from first contact | Based on last customer activity |
| Goal | Nurture new leads | Recover lapsed leads |
| Frequency | Multi-step sequence | Typically one message |
Re-engagement only fires once per conversation. If the customer doesn't respond to the
re-engagement message, the system won't send additional attempts.
Appointment-related re-engagement [#appointment-related-re-engagement]
You can also enable **appointment reminders** that automatically remind customers of
upcoming scheduled appointments:
In the Re-Engagement tab, find the
**Appointment Reminders**
section.
Toggle reminders
**On**
.
Set the
**Reminder Timing**
— how far in advance to send (e.g., 24 hours before).
Save your changes.
Tips [#tips]
* Set the inactivity period long enough to avoid feeling pushy (3–7 days is typical).
* Re-engagement messages should offer something new — a price drop, new inventory, or a
simple "Still looking?" check-in.
* Monitor conversion rates in **Analytics** to find the optimal inactivity period.
* Combine with [Follow-Up sequences](/docs/portal/reach/set-up-follow-up-sequences) for a
complete lead nurturing strategy.
# How to enable and configure Reach (/docs/portal/reach/enable-and-configure-reach)
DealerAI Reach automates outbound customer communication — follow-ups, re-engagement, and
appointment reminders — across SMS, email, and social channels. Before using any Reach
features, you need to enable it and configure your channel preferences.
Enable Reach [#enable-reach]
Go to
**Reach**
from the sidebar.
On the
**General Configuration**
tab, find the
**Enable DealerAI Reach**
toggle.
Switch the toggle to
**On**
.
Additional configuration sections appear once Reach is enabled.
Set channel preferences [#set-channel-preferences]
Once enabled, configure how Reach communicates with customers:
In General Configuration, choose your
**Primary Channel**
preference — whether to prioritize SMS or Email for outbound messages.
Enable or disable individual channels (SMS, Email, Facebook, Instagram) based on your dealership's needs.
Configure fallback behavior — what happens when the primary channel is unavailable (e.g., no phone number on file).
Click
**Save**
to apply your preferences.
What Reach controls [#what-reach-controls]
Once enabled, Reach manages:
* **Follow-up sequences** — automated multi-step messages after initial contact
* **Inbound sequences** — auto-responses when new leads arrive (ADF, web forms)
* **Re-engagement** — reaching out to lapsed leads after a period of inactivity
* **Appointment reminders** — automated reminders before scheduled appointments
Channel priority logic [#channel-priority-logic]
Reach uses this priority when deciding how to contact a customer:
1. Your configured primary channel (SMS or Email)
2. Fallback to the other channel if primary delivery fails
3. Social channels (Facebook/Instagram) if the conversation originated there
Reach respects customer opt-out preferences. If a contact has unsubscribed from SMS,
Reach will automatically fall back to email — it will never contact opted-out customers.
Tips [#tips]
* Start with SMS as primary — it has significantly higher open rates than email.
* Enable Reach on a small set of leads first to validate your sequences before going wide.
* Review the [Follow-Up](/docs/portal/reach/set-up-follow-up-sequences) and
[Email Settings](/docs/portal/reach/configure-email-settings) guides to complete your setup.
# Reach (/docs/portal/reach)
**Reach** is DealerAI's automation control center for follow-up and lead-routing behavior across email, SMS, and supported voice flows.
General Configuration [#general-configuration]
The current Reach sidebar includes these pages:
* **General Configuration**
* **Follow Up**
* **Forward Leads**
* **Fall Through**
* **Inbound Sequences**
The **General Configuration** page contains the high-level automation controls, including options for:
* Prioritizing **email** for incoming ADF leads
* Prioritizing **voice** when multiple channels are available
* Enabling **Email Reach Automation**
* Managing inbound and outbound email addresses
* Enabling **SMS** automation
* Enabling **voice** automation when voice settings are configured
* Selecting the voice agent used for Reach flows
Start here when you need to confirm how Reach behaves overall before tuning specific follow-up pages.
Follow Up [#follow-up]
Use **Follow Up** to schedule continued outreach after the initial interaction.
From the current portal UI, this page includes channel-specific controls for:
* **SMS** follow-up
* **Email** follow-up
* **Voice** follow-up
* **Facebook/Meta** follow-up when configured
This is where dealership teams tune ongoing contact timing and channel usage after a customer enters the workflow.
Forward Leads, Fall Through, and Inbound Sequences [#forward-leads-fall-through-and-inbound-sequences]
* Use **Forward Leads** to route incoming ADF leads to the right destinations and providers.
* Use **Fall Through** to define what happens when a lead does not move through the normal path.
* Use **Inbound Sequences** to configure provider- and channel-based automation for inbound ADF leads.
Typical workflow [#typical-workflow]
Open
**Reach**
from the main navigation.
Select the dealership you want to configure.
Review
**General Configuration**
first to confirm the active channels and priorities.
Adjust
**Follow Up**
,
**Forward Leads**
,
**Fall Through**
, or
**Inbound Sequences**
as needed.
Save the updated Reach settings and validate the resulting customer flow.
Notes [#notes]
* Reach is dealership-specific and strongly tied to live automation behavior.
* Channel-specific controls only appear when the dealership is configured for those channels.
* If you are documenting follow-up workflows, pair Reach with **Leads**, **Contacts**, and **Appointments** so the full process is clear.
# How to set up follow-up sequences (/docs/portal/reach/set-up-follow-up-sequences)
Follow-up sequences let you define a series of timed messages that are automatically sent
to leads after their initial interaction. Each step in the sequence can use a different
channel (SMS, email) and timing delay.
Create a follow-up sequence [#create-a-follow-up-sequence]
Go to
**Reach**
from the sidebar.
Select the
**Follow Up**
tab.
Click
**Add Step**
to create a new message in the sequence.
Choose the
**Channel**
— SMS, Email, or both.
Set the
**Delay Value**
and
**Delay Unit**
(e.g., 2 hours, 1 day).
Write or select the
**Message Template**
for this step.
Repeat to add additional steps in the sequence.
Click
**Save**
to activate the sequence.
Example sequence [#example-sequence]
| Step | Delay | Channel | Purpose |
| ---- | --------- | ------- | ---------------------------------- |
| 1 | 5 minutes | SMS | Immediate acknowledgment |
| 2 | 4 hours | SMS | Follow-up with vehicle suggestions |
| 3 | 2 days | Email | Detailed comparison with photos |
| 4 | 5 days | SMS | Check-in and offer test drive |
How timing works [#how-timing-works]
* Delays are measured from the **previous step**, not from the initial contact.
* If a customer replies at any point, the sequence pauses and the AI handles the live
conversation. The sequence resumes only if the customer goes silent again.
* Steps are skipped if the customer's contact info doesn't support the channel (e.g., no
email on file skips email steps).
The AI personalizes each message using the lead's context — vehicle interest, name, and
conversation history. You're setting the timing and channel, not writing static templates.
Reorder or remove steps [#reorder-or-remove-steps]
Drag steps to reorder them in the sequence.
Click the
**delete**
icon on any step to remove it.
Save your changes.
Tips [#tips]
* Front-load the sequence — the first 24 hours are critical for lead engagement.
* Mix channels to increase the chance of getting a response.
* Keep individual messages short and focused on a single call-to-action.
* Review your sequence performance in **Analytics** and adjust timing based on response rates.
# Activation and Features (/docs/portal/settings/activation-and-features)
**Activation and Features** is the main feature control panel for a dealership. It governs whether the AI is active, which languages it supports, when it automatically turns off, and how advanced features like lease estimates and anti-spam behave.
Most settings on this page are read-only if the dealership does not have an active or trialing subscription.
Core settings [#core-settings]
Chatbot active [#chatbot-active]
Master switch to enable or disable the AI across all channels. When off, the chatbot will not respond to any incoming messages regardless of channel.
Supported languages [#supported-languages]
Multi-select field listing the languages the AI is configured to understand and respond in. The AI will auto-detect the customer's language and reply accordingly when multiple languages are enabled.
Auto-off schedules [#auto-off-schedules]
You can configure the AI to automatically turn off outside of business hours on a per-channel basis.
Auto Off Schedule for Webchat [#auto-off-schedule-for-webchat]
Enables time-based automatic deactivation for the webchat widget. Set opening and closing times per day, and mark specific days as closed.
Auto Off Schedule for Facebook [#auto-off-schedule-for-facebook]
Same schedule configuration, applied independently to the Facebook Messenger channel.
Estimate settings [#estimate-settings]
Lease estimate settings [#lease-estimate-settings]
When enabled, the AI can calculate and present lease payment estimates. Configure per manufacturer:
| Field | Description |
| ---------------------- | ------------------------------------------------------------ |
| **Manufacturer** | The vehicle brand these rates apply to. |
| **Interest Rate (%)** | Money factor or interest rate used in the lease calculation. |
| **Down Payment** | Default down payment amount. |
| **Term (months)** | Lease term length. |
| **Residual Value (%)** | Vehicle residual value percentage at end of term. |
Finance estimate settings [#finance-estimate-settings]
Same structure as lease estimates. Residual value is locked at 0% for finance calculations.
Finance calculator [#finance-calculator]
Configures the dealership-specific finance calculator with email, region, and a list of term/rate pairs used to generate payment estimates.
Proximity search [#proximity-search]
**Proximity Search Mode** — Controls how the AI handles location-based vehicle searches:
| Option | Behavior |
| ----------------------------- | ---------------------------------------------------------------- |
| **Off** | No proximity search. |
| **Auto-detect User Location** | Uses browser geolocation to find nearby inventory automatically. |
| **Ask For User Location** | Prompts the customer to share their location before searching. |
Anti-spam settings [#anti-spam-settings]
Protects the dealership from spam or repeated automated messages:
| Setting | Description |
| --------------------------- | ------------------------------------------------------------------------------------------ |
| **Hard stop SMS count** | Number of messages after which the SMS conversation is blocked. |
| **Hard stop email count** | Same limit for email conversations. |
| **Hard stop webchat count** | Same limit for webchat conversations. |
| **Ask for contact at** | Message count at which the AI requests customer contact information. |
| **Unblock after** | Time period after which a blocked contact is automatically unblocked. |
| **Spam repeat threshold** | Repeat message threshold used to identify spam patterns. |
| **Forward lead on spam** | When enabled, leads flagged as spam are still forwarded to the configured email addresses. |
Flag notification settings [#flag-notification-settings]
When enabled, sends email alerts when a conversation is flagged for review. Configure the list of recipient email addresses.
Compare car tool [#compare-car-tool]
**Enable Compare Car Tool** — Allows the AI to present side-by-side vehicle comparisons when customers ask to compare models.
# Active Messages (/docs/portal/settings/active-messages)
**Active Messages** lets you define rules that automatically trigger a specific message or action button set when a customer opens the webchat widget on a particular URL of your website.
How it works [#how-it-works]
Each rule matches a URL pattern on the dealership's website. When a customer lands on a page whose URL contains the rule's URL pattern and opens the chat widget, the configured action is triggered automatically.
Rule fields [#rule-fields]
Each rule entry includes:
| Field | Description |
| ------------------ | --------------------------------------------------------------------------------------------------------------------------- |
| **URL** | The URL path or pattern to match. The rule fires when the webchat widget is loaded on a page whose URL contains this value. |
| **Action** | The behavior to trigger. Currently supports `CustomMessage`. |
| **Custom Message** | The message to display automatically when the rule's URL is matched. Only shown when Action is set to `CustomMessage`. |
Action buttons [#action-buttons]
Each rule can also have its own set of **Action Buttons** — quick-reply buttons presented to the customer alongside the custom message. Each button has:
| Field | Description |
| ----------- | ---------------------------------------------------------------------- |
| **Title** | The button label shown to the customer. |
| **Message** | The message sent on behalf of the customer when they click the button. |
Action buttons within a rule can be reordered by drag-and-drop.
Managing rules [#managing-rules]
* Use the **Add** button to create a new rule.
* Use the delete icon to remove a rule.
* Use the up (↑) and down (↓) arrows to change rule priority order.
URL matching is substring-based — a rule with URL `/inventory` will match any page whose URL contains `/inventory`, such as `/inventory/new` or `/inventory/used`.
# Analytics Tracking (/docs/portal/settings/analytics-tracking)
**Analytics Tracking** connects the DealerAI webchat widget to Google Analytics so you can measure chat engagement events alongside your existing website analytics.
Fields [#fields]
Enable analytics tracking [#enable-analytics-tracking]
Toggle this on to activate GA4 event tracking for the webchat widget. When enabled, the widget fires events for actions such as chat opens, engagement, lead capture, and popup views.
Google Analytics Measurement ID [#google-analytics-measurement-id]
Enter your GA4 **Measurement ID** (format: `G-XXXXXXXXXX`). This is found in your Google Analytics account under **Admin → Data Streams → Web stream details**.
DealerAI tracks these webchat events in GA4: `Initialization`, `Popup`, `Lead`, `Engaged`, and `ResizeComponent`. These appear in your GA4 real-time and event reports.
Setup steps [#setup-steps]
In Google Analytics, open
**Admin → Data Streams**
and copy the
**Measurement ID**
for your dealership website stream.
In the DealerAI portal, open
**Settings → Analytics Tracking**
.
Toggle
**Enable analytics tracking**
on.
Paste the Measurement ID into the field provided.
Save. Chat events will begin appearing in GA4 within 24–48 hours.
# How to configure business hours (/docs/portal/settings/configure-business-hours)
Business hours tell the AI when your dealership is open. The bot uses this information
to set customer expectations, offer appropriate appointment times, and provide after-hours
messaging when you're closed.
Set business hours [#set-business-hours]
Go to
**Settings**
from the sidebar.
Select the
**Hours**
section.
For each day, use the time pickers to set the
**Opening Time**
and
**Closing Time**
.
Switch on the
**Closed**
toggle for days you're not open (e.g., Sunday).
Click
**Save**
to apply your schedule.
How the AI uses business hours [#how-the-ai-uses-business-hours]
| Scenario | AI Behavior |
| ------------ | ---------------------------------------------------------------------------- |
| During hours | Offers appointments, suggests visits, provides full service |
| After hours | Tells customers you're closed, gives next opening time, still captures leads |
| Booking | Only offers appointment slots within open hours |
| Holidays | Hours are overridden by [Holidays](/docs/portal/holidays) closures |
Set different hours by day [#set-different-hours-by-day]
Most dealerships have varying hours (e.g., shorter Saturday hours, closed Sunday):
| Day | Example Hours |
| ------------- | ----------------- |
| Monday–Friday | 9:00 AM – 7:00 PM |
| Saturday | 9:00 AM – 5:00 PM |
| Sunday | Closed |
Simply set each day independently using the time pickers and closed toggle.
Temporary hour changes [#temporary-hour-changes]
For one-time schedule changes (early close, special event):
* For a **full-day closure**, add a [Holiday](/docs/portal/holidays/add-a-holiday) instead
* For a **partial-day change** (e.g., closing early at 3 PM on Friday), temporarily update
the hours for that day and remember to change them back
Business hours apply to all AI interactions including appointment booking, after-hours
messaging, and Reach sequence timing. The AI won't send messages or book appointments
outside your configured hours.
Tips [#tips]
* Set hours to match your **customer-facing** schedule, not staff working hours.
* If your sales and service departments have different hours, check with your administrator
about department-specific scheduling.
* Review hours seasonally — many dealerships extend hours in summer or during sales events.
* After changing hours, test with **Preview** to verify the AI gives correct open/close times.
# How to customize webchat (/docs/portal/settings/customize-webchat)
The webchat widget is embedded on your dealership's website. Customizing it ensures the
chat matches your brand and creates a professional first impression for visitors.
Customize the bot avatar [#customize-the-bot-avatar]
Go to
**Settings**
from the sidebar.
Select the
**Webchat**
section.
Find the
**Bot Avatar**
uploader.
Upload your preferred avatar image (your dealership logo or a friendly icon).
Crop or adjust the image if prompted.
Click
**Save**
.
The avatar appears in the chat bubble and alongside bot messages in the conversation.
Set brand colors [#set-brand-colors]
In the Webchat settings, locate the
**Colors**
section.
Set the
**Accent Color**
— used for the chat bubble, send button, and header. Enter a hex value or use the color picker.
Set the
**Text Color**
— for text on colored elements. Ensure sufficient contrast.
Preview the changes in the real-time
**Chat Preview**
panel on the right.
Click
**Save**
when satisfied.
Configure the welcome message [#configure-the-welcome-message]
The welcome message is what customers see before they start typing — it sets the tone
and tells visitors what the AI can help with.
In the Webchat settings, find the
**Welcome Messages**
section.
Select the
**Locale**
(e.g., English, French) for multi-language support.
Type your welcome
**Message**
— this appears when the chat widget opens.
Add additional locales if your dealership serves multilingual customers.
Click
**Save**
.
Example welcome messages [#example-welcome-messages]
| Style | Message |
| --------------- | ----------------------------------------------------------------------------------------------------- |
| Friendly | "Hi! 👋 I'm here to help you find your next vehicle. Ask me anything!" |
| Professional | "Welcome to Smith Honda. How can I assist you today?" |
| Action-oriented | "Looking for a vehicle? Tell me what you need — make, model, budget — and I'll find options for you." |
Use the preview panel [#use-the-preview-panel]
The **Chat Preview** shows a live mockup of your widget with current settings applied.
Use it to verify:
* Colors look good on both light and dark backgrounds
* Avatar displays clearly at small sizes
* Welcome message reads well and isn't too long
Webchat appearance changes affect all pages where the widget is embedded. Changes are
applied immediately after saving — no code changes or redeployment needed on your website.
Tips [#tips]
* Match your accent color to your dealership's primary brand color for consistency.
* Keep welcome messages under two sentences — visitors want to start chatting, not reading.
* Use a square, high-contrast image for the avatar — it renders small in the chat bubble.
* Test on mobile after saving — the widget should look good on all screen sizes.
* If you support multiple languages, set locale-specific welcome messages for each.
# Departments (/docs/portal/settings/departments)
**Departments** lets you configure the personnel list that the AI references when customers ask to speak with or contact a specific department or staff member.
Fields [#fields]
Send link instead of personnel [#send-link-instead-of-personnel]
When this toggle is enabled, the AI sends a **Personnel Info Link URL** (a single URL you specify) instead of listing individual staff members directly in the conversation.
When disabled, the AI can reference individual entries from the personnel list below.
Personnel list [#personnel-list]
Add one or more staff members. Each entry includes:
| Field | Description |
| -------------- | ------------------------------------------------- |
| **Name** | Full name of the staff member. |
| **Phone** | Direct phone number for the staff member. |
| **Email** | Email address for the staff member. |
| **Department** | The department this person belongs to. |
| **Title** | Job title (e.g., Sales Manager, Service Advisor). |
**Available departments:**
* Sales
* Body Shop
* Service
* Parts
* Detail Center
* PPF & Tint Center
Reordering [#reordering]
Use the up (↑) and down (↓) arrows on each entry to change the display order. The order can affect which contact the AI surfaces first when a customer asks for a department.
# Facebook & Instagram (/docs/portal/settings/facebook-and-instagram)
**Facebook & Instagram** links the dealership's Facebook pages and Instagram accounts to DealerAI, enabling the AI to handle incoming messages from Meta channels automatically.
Connecting a Facebook page [#connecting-a-facebook-page]
Click
**Login with Facebook**
. A Meta OAuth pop-up will open.
Authenticate with a Facebook account that has admin access to the dealership's page.
Grant the requested permissions (Pages messaging and Instagram messaging scopes).
After authorization, the connected page(s) appear in the table below.
The Facebook account used to connect must have **Page admin** or **Editor** role on the dealership's Facebook Page.
Connected pages table [#connected-pages-table]
After connecting, each linked page is listed with:
| Column | Description |
| ---------------------- | --------------------------------------------------------------------- |
| **Page ID** | The unique Facebook Page identifier. |
| **Name** | The Facebook Page name. |
| **Access Token** | The long-lived page access token. Use the copy button to copy it. |
| **Instagram User ID** | The Instagram Business account ID linked to this page (if connected). |
| **Instagram Username** | The Instagram Business username. |
Each row has a **Connect / Disconnect** action to enable or disable AI messaging for that page.
Embed script [#embed-script]
After connecting a page, a **Facebook embed script** is generated. Copy this script and add it to your dealership website `` or `` to enable the Facebook Messenger chat plugin on your site.
Options [#options]
**Align Facebook chat left** — When enabled, the Facebook Messenger chat bubble appears on the left side of your website instead of the default right side.
# General Info (/docs/portal/settings/general-info)
**General Info** is the primary identity page for a dealership in DealerAI. It controls the name, contact details, and location information that the AI surfaces in conversations.
Fields [#fields]
Basic information [#basic-information]
| Field | Description |
| ---------------------- | ---------------------------------------------------------------------------------------- |
| **Name** | The dealership's display name. Used throughout the portal and in AI responses. Required. |
| **Site URL** | The dealership's main website URL. |
| **Privacy URL** | Link to the dealership's privacy policy page. |
| **Google Reviews URL** | Link to the dealership's Google Business profile or reviews page. |
Locations [#locations]
Add one or more dealership locations. Each location entry includes:
| Field | Description |
| -------------------- | -------------------------------------------------------------- |
| **Location Name** | A label for the location (e.g., "Main Lot", "North Location"). |
| **Full Address** | The complete street address displayed to customers. |
| **Address Line 1** | First line of the street address. |
| **State / Province** | State or province of the location. |
| **Country** | Country of the location. |
| **Google Maps URL** | Direct link to the location on Google Maps. |
**Send link instead of address** — When enabled, the AI sends a Location Link URL rather than the raw address text.
Phone numbers [#phone-numbers]
Add one or more phone numbers, each with a contact type (e.g., Sales, Service, Parts). The AI will reference these when customers ask for dealership contact information.
**Send link instead of contact** — When enabled, the AI sends a Contact Info Link URL rather than listing phone numbers and email addresses directly.
Email addresses [#email-addresses]
Add one or more email addresses, each with a contact type. Used when customers request contact information via email channels.
Inventory link [#inventory-link]
| Toggle | Description |
| ----------------------------------- | --------------------------------------------------------------------------------------------------------------- |
| **Send link on null car search** | When the AI cannot find a matching vehicle, it sends the Car Inventory Link URL to the customer. |
| **Send message on null car search** | When enabled, sends a custom text message instead of (or in addition to) a link when no vehicle match is found. |
| **Send promotion reply link** | When enabled, the AI includes a Promotion Reply Link URL in promotional responses. |
# Hours (/docs/portal/settings/hours)
**Hours** configures the dealership's operating hours and timezone. The AI uses this information to determine whether the dealership is currently open and to answer customer questions about hours.
Fields [#fields]
Timezone [#timezone]
Select the dealership's local timezone from the autocomplete dropdown. This is required and ensures that opening/closing times are evaluated correctly relative to the customer's inquiry time.
Hours blocks [#hours-blocks]
Add one or more hour-type entries — one per department or business area. Each block includes:
**Department / Type** — The business area these hours apply to. Typical types include:
* Sales
* Body Shop
* Service
* Parts
**Per-day configuration** — For each day of the week, set:
| Field | Description |
| ---------------------- | ------------------------------------------ |
| **Opening time** | Time the department opens. |
| **Closing time** | Time the department closes. |
| **Closed on this day** | Checkbox to mark a day as closed entirely. |
Send link instead of hours [#send-link-instead-of-hours]
When enabled, the AI sends a **Hours Link URL** to customers instead of stating hours directly in the conversation. You can configure multiple links (each with a Name and URL) for different hours pages or departments.
The AI respects business hours when deciding whether to hand off to a human or handle the conversation autonomously. Reach sequences also observe these hours settings.
# Settings (/docs/portal/settings)
The **Settings** section is the main dealership configuration workspace in the DealerAI portal. Each subtopic controls a specific area of the dealership's AI behavior, channel integrations, and contact information.
Settings pages [#settings-pages]
Typical workflow [#typical-workflow]
Open
**Settings**
from the navigation.
Select the dealership you want to configure.
Choose the relevant page from the left sidebar.
Update the fields, toggles, or lists for that area.
Save the changes before moving to another section.
# Lead Generation (/docs/portal/settings/lead-generation)
**Lead Generation** controls how DealerAI sends captured lead information to the dealership. Two delivery formats are supported: formatted HTML email and ADF (Auto-Lead Data Format) XML.
Fields [#fields]
Lead name [#lead-name]
The name used to identify this dealership's leads in delivered emails. This appears as the lead source or sender label in the email.
HTML email [#html-email]
**Send HTML email** — When enabled, DealerAI sends a formatted HTML email containing the lead's contact information and vehicle interest to the configured recipient addresses.
Add one or more email addresses to the **HTML recipients** list. All addresses receive the HTML lead email when a new lead is captured.
ADF email [#adf-email]
**Send ADF email** — When enabled, DealerAI sends the lead as an ADF (Auto-Lead Data Format) XML attachment. ADF is the automotive industry standard for passing lead data between systems and is compatible with most CRM platforms.
Add one or more email addresses to the **ADF recipients** list.
ADF leads are typically forwarded to a CRM's lead inbox. Check your CRM documentation for the correct ADF import email address to use here.
Both HTML and ADF delivery can be enabled simultaneously, sending to their respective recipient lists independently.
# Notifications (/docs/portal/settings/notifications)
**Notifications** controls how portal users are alerted about new messages and unassigned conversations — via mobile push notifications and email.
Mobile app push notifications [#mobile-app-push-notifications]
Choose how often the mobile app sends push notification alerts:
| Option | Behavior |
| ------------------------- | ----------------------------------------------------------- |
| **None** | No push notifications are sent. |
| **New conversation only** | A push notification is sent when a new conversation starts. |
| **Every new message** | A push notification is sent for each incoming message. |
Email notifications [#email-notifications]
New message alert [#new-message-alert]
**Send email when new chat messages received** — Sends an email to the configured recipients when a new inbound chat message arrives.
Human handoff alert [#human-handoff-alert]
**Send email when user asks for rep** — Sends an email when the AI detects that a customer is requesting to speak with a human representative.
Unassigned chat digest [#unassigned-chat-digest]
**Send scheduled email for unassigned chats** — Sends a periodic email digest listing conversations that have not been assigned to a staff member.
Email recipients [#email-recipients]
When any email notification toggle is enabled, you must provide one or more recipient email addresses. All active notification types share the same recipient list.
Email notifications are sent to the addresses listed here, not to the individual agent assigned to a conversation. Make sure to include at least one active staff inbox.
# SMS (/docs/portal/settings/sms)
**SMS** shows the dealership's provisioned Twilio phone number and lets you control whether the AI responds automatically to incoming text messages.
Fields [#fields]
SMS number [#sms-number]
Displays the dealership's assigned SMS number. This is provisioned by DealerAI and is read-only. Contact support if you need a number assigned or changed.
AI activation [#ai-activation]
**AI Activation** — Toggle this on to enable the AI to automatically respond to inbound SMS messages sent to the dealership's number.
The AI Activation toggle is only shown once an SMS number has been provisioned for the dealership.
SMS welcome message [#sms-welcome-message]
When **AI Activation is off**, you can set an **SMS Welcome Message** — a static auto-reply sent to any customer who texts the dealership number. This message is used in place of AI-generated responses.
When AI is activated, the AI handles the conversation and the welcome message field is hidden.
# How to update dealership info (/docs/portal/settings/update-dealership-info)
Dealership info is the foundation of your AI configuration — the bot uses these details
to introduce itself, provide directions, share contact information, and represent your
business accurately in every conversation.
Update dealership information [#update-dealership-information]
Go to
**Settings**
from the sidebar.
Select the
**General Info**
section.
Update the
**Dealership Name**
and
**Physical Address**
.
Add or update
**Phone Numbers**
and
**Email Addresses**
.
Set the
**Car Inventory Link**
— URL to your searchable inventory page.
Click
**Save**
to apply your changes.
Changes take effect immediately in new conversations.
What the AI does with this information [#what-the-ai-does-with-this-information]
The dealership info is used throughout the AI's responses:
* **Greetings** — "Welcome to \[Dealership Name]! How can I help?"
* **Location questions** — "We're located at \[Address]. Would you like directions?"
* **Contact info** — "You can reach us at \[Phone] or \[Email]"
* **Inventory links** — "Browse our full inventory at \[Link]"
* **After-hours messages** — references your name and location when closed
What to include [#what-to-include]
| Field | Best Practice |
| -------------- | ----------------------------------------------------------------------------------------- |
| Name | Use the name customers search for (e.g., "Smith Honda" not "Smith Automotive Group Ltd.") |
| Address | Full street address including suite/unit if applicable |
| Phone | Main sales line first, then service if separate |
| Email | Customer-facing address, not internal staff emails |
| Inventory Link | Direct link to your searchable inventory page |
If your dealership has multiple locations, each location has its own settings.
Make sure you've selected the correct dealership in the top picker before editing.
Tips [#tips]
* Keep the dealership name concise — it appears in greetings and messages.
* Update the address if you relocate, even temporarily — the AI gives directions based on this.
* Add both sales and service phone numbers if they differ — the AI routes customers appropriately.
* Verify your inventory link works and lands on a searchable page, not a generic homepage.
# Voice Settings (/docs/portal/settings/voice-settings)
**Voice Settings** controls the behavior of DealerAI's voice agent — the AI that handles inbound and outbound phone calls for the dealership.
Voice Settings are only visible when the voice feature is enabled for the dealership's account.
Basic configuration [#basic-configuration]
Voice number [#voice-number]
The dealership's provisioned voice phone number. Read-only — contact support to change.
Voice [#voice]
Choose the AI voice from OpenAI's available voice options. A **play** button lets you preview each voice with the sample text before saving.
| Voice | Character |
| ------- | ------------------------- |
| Alloy | Neutral and balanced |
| Ash | Warm and conversational |
| Ballad | Expressive and dynamic |
| Coral | Friendly and approachable |
| Echo | Clear and professional |
| Sage | Calm and authoritative |
| Shimmer | Bright and energetic |
| Verse | Versatile and natural |
Tone [#tone]
Controls the overall communication style of the voice agent:
| Tone | Description |
| ---------------- | ---------------------------------- |
| **Professional** | Formal, businesslike interactions. |
| **Friendly** | Warm, approachable style. |
| **Exciting** | Enthusiastic and high-energy. |
Sample text for voice playback [#sample-text-for-voice-playback]
Enter custom text used to preview the selected voice and tone combination. Click the play button to hear a sample before saving.
Call forwarding [#call-forwarding]
Enable forward call to staff [#enable-forward-call-to-staff]
When enabled, the AI can transfer calls to human staff members. Configure:
| Field | Description |
| ------------------------------ | ----------------------------------------------------------------------------------------------------------------------- |
| **Default Agent Phone Number** | The fallback number to forward calls to when no specific agent is matched. |
| **Named agents** | A list of staff members the AI can forward to, each with Name, Phone, Extension, and Delay (seconds before forwarding). |
Forward booking call in hour [#forward-booking-call-in-hour]
When enabled, calls related to appointment booking are forwarded to staff during business hours.
Redirect phone number when AI off [#redirect-phone-number-when-ai-off]
The phone number that inbound calls are redirected to when the AI is deactivated or the dealership is outside business hours.
Call limits [#call-limits]
Max voice call duration (minutes) [#max-voice-call-duration-minutes]
Sets the maximum allowed length for a single AI voice call. Range: 1–180 minutes. Calls exceeding this limit are ended automatically.
Reminders [#reminders]
Configure voice reminder messages that the AI delivers at scheduled intervals or trigger points during a call or conversation.
Background noise [#background-noise]
Waiting noise [#waiting-noise]
**Waiting Noise Enabled** — Plays background noise while a customer is on hold or waiting. When enabled, configure:
* **Volume** — Set the waiting noise volume: 25%, 50%, 75%, or 100%.
* Use the play button to preview the sound at the selected volume.
Passive noise [#passive-noise]
**Passive Noise Enabled** — Plays subtle ambient background audio during AI speech to make the voice agent sound more natural and less robotic. When enabled, select a **Passive Noise Type** from the dropdown and preview it with the play button.
# Webchat (/docs/portal/settings/webchat)
**Webchat** controls the appearance and behavior of the DealerAI chat widget embedded on the dealership's website.
Fields [#fields]
Avatar / personality [#avatar--personality]
Select the AI persona that appears in the webchat widget. Each avatar option comes with a name and visual representation. Click **Select Avatar** to open the avatar browser and choose a different personality.
Brand colors [#brand-colors]
Use the color pickers to customize the widget's color scheme. Colors are set using RGBA or hex values and a live preview updates as you make changes.
Welcome messages [#welcome-messages]
Configure the message shown to customers when they first open the chat widget. You can set a welcome message per locale to support multiple languages:
| Column | Description |
| ------------------- | ------------------------------------------------------------------------------- |
| **Locale** | The language/region code (read-only, set by supported languages configuration). |
| **Welcome Message** | The greeting text shown to the customer when the widget opens. |
Action buttons [#action-buttons]
Quick-reply buttons that appear in the webchat widget as conversation starters. Each button has:
| Field | Description |
| ----------- | ---------------------------------------------------------------------- |
| **Title** | The button label shown to the customer. |
| **Message** | The message sent on behalf of the customer when they click the button. |
Drag buttons to reorder them. The order determines how they appear in the widget.
Custom CSS [#custom-css]
An inline code editor (CodeMirror) where you can enter custom CSS to override default widget styles. Changes apply to the widget's scoped styles.
Preview panel [#preview-panel]
A live preview of the chat widget appears alongside the settings form, reflecting color and avatar changes in real time before saving.
Changes to colors and avatar take effect immediately after saving. CSS changes may require a page refresh on the dealership's website to appear.
# Whitelisted Domain (/docs/portal/settings/whitelisted-domain)
**Whitelisted Domain** controls which website domains are authorized to load the DealerAI webchat widget. This prevents unauthorized sites from embedding your chat widget.
Fields [#fields]
Approved domains [#approved-domains]
Enter one domain URL per line. Only the listed domains will be allowed to load the webchat widget.
**Format:** Enter the full origin URL for each domain, for example:
```
https://www.yourdealership.com
https://inventory.yourdealership.com
https://localhost:3000
```
If this list is empty, the widget will load on any domain. Add your dealership's production URL here to prevent unauthorized embedding once you go live.
Include all domains where you have installed the widget snippet, including staging and development environments, or the widget will not load on those domains.
# Subscription (/docs/portal/subscription)
The Subscription section is where you manage your DealerAI plan, review your billing status,
and make changes to your payment details or tier.
Overview [#overview]
DealerAI offers tiered subscription plans based on the number of dealerships, conversation
volume, and features required. Your current plan determines which features are available in
the portal.
Viewing Your Current Plan [#viewing-your-current-plan]
The Subscription page shows:
| Item | Description |
| ------------------- | ------------------------------------------------------ |
| **Current plan** | The active subscription tier and its included features |
| **Billing cycle** | Monthly or annual billing, and the next billing date |
| **Payment method** | The card or payment method on file |
| **Invoice history** | Past invoices available to download as PDF |
Changing Your Plan [#changing-your-plan]
To upgrade or downgrade your subscription:
Navigate to
**Subscription**
in the sidebar
Review the available plans in the pricing table
Click
**Select Plan**
on the tier that suits your needs
Confirm the change — upgrades take effect immediately, downgrades at the end of the current billing period
Plan changes and billing are processed securely through Stripe. DealerAI does not store your
full card details.
Updating Payment Details [#updating-payment-details]
To update your billing card or payment method:
Click
**Update Payment Method**
on the Subscription page
Enter the new card details in the secure Stripe form
Click
**Save**
— your next invoice will be charged to the new method
Cancelling Your Subscription [#cancelling-your-subscription]
To cancel, contact your DealerAI account manager or support team. Upon cancellation:
* Access continues until the end of the current billing period
* Conversation data and configurations are retained for 30 days after cancellation for export
* AI agents stop responding to customers at the end of the active period
Plan Features by Tier [#plan-features-by-tier]
Contact your DealerAI account manager for detailed feature comparisons across plans, or visit
the pricing page from the Subscription section for the latest information.
# User Profile (/docs/portal/user-profile)
The **User Profile** panel lets each portal user manage their own account information — display name, avatar, job title, email signature, and password. It is accessible from the user menu in the top navigation bar.
Viewing your profile [#viewing-your-profile]
Click your avatar or name in the top-right corner of the portal to open the user menu, then select **Profile** to open the profile view panel.
The profile view displays a read-only summary of your account:
| Field | Description |
| --------------------------- | ------------------------------------------------------------------------------------------------------------------------------------------ |
| **Name** | Your full first and last name. |
| **Active / Inactive badge** | A green check indicates your account is active; a red minus indicates it is inactive. |
| **Title** | Your job title at the dealership. |
| **Email** | Your login email address. |
| **Site Roles** | Portal roles assigned to your account (e.g., `Site Admin`, `Site User`). |
| **Associated Dealers** | Dealerships linked to your account. Each entry shows the dealer name and whether it is your **Primary Dealer** or an **Associate Dealer**. |
| **Organizations** | Organizations your account belongs to. |
Click **Edit** to open the edit form and make changes.
Editing your profile [#editing-your-profile]
The edit form allows you to update personal details. Fields that are managed by an administrator (email, roles, and dealer assignments) are read-only.
Profile photo [#profile-photo]
Click the avatar circle to upload a new profile photo. You can also remove the current photo. Supported formats are standard image files (JPEG, PNG, etc.).
Name and title [#name-and-title]
| Field | Required | Description |
| -------------- | -------- | ------------------------------------------------ |
| **First Name** | Yes | Your first name. |
| **Last Name** | Yes | Your last name. |
| **Title** | Yes | Your job title (e.g., Sales Manager, BDC Agent). |
Email [#email]
Your email address is displayed but **cannot be changed** from this form. Contact your administrator to update your login email.
Email signature [#email-signature]
The **Email Signature** editor allows you to compose a rich-text signature that is appended to outbound emails sent on your behalf. Use the editor toolbar to format text, add links, or include your contact details.
Password [#password]
To set a new password, enter it in the **Password** field. Passwords must be at least **8 characters** long. Leave the field empty to keep your current password.
Use the eye icon on the right of the field to toggle password visibility.
Dealers and primary dealer [#dealers-and-primary-dealer]
Your dealer associations are managed by administrators and are displayed as read-only. If you are assigned to multiple dealerships, you can update your **Primary Dealer** using the **Select Primary Dealer** dropdown. The primary dealer determines the default context used throughout the portal.
Dealer role assignments (e.g., Sales, BDC) are set by administrators and cannot be changed from your own profile.
Saving changes [#saving-changes]
Click **Save** to apply your changes. A success toast will confirm the update. Click **Cancel** to discard changes and return to the profile view.
Deleting your account [#deleting-your-account]
Account deletion is permanent and cannot be undone. All personal data associated with your account will be removed.
In the edit form, click the **Delete** button at the bottom-left. A confirmation dialog will appear asking you to confirm the deletion.
Click **Confirm** to permanently delete your account. You will be signed out immediately.
# How to add a service (/docs/portal/vehicle-services/add-a-service)
Services are the maintenance and repair items your dealership offers. Adding them to
DealerAI lets the AI recommend specific services, provide pricing information, and book
service appointments on behalf of customers.
Add a service [#add-a-service]
Go to
**Services**
from the sidebar.
Click
**Add Service**
.
Enter a
**Name**
— a clear service title (e.g., "Oil Change", "Brake Pad Replacement").
Add
**Tags**
to categorize the service (e.g., "oil change", "maintenance").
Write a
**Description**
explaining what the service includes.
Enter the
**Cost**
for the service.
Optionally upload an
**Image**
for the service using the image uploader at the top of the form.
Click
**Save**
to add the service to your catalog.
The new service is immediately available for the AI to reference in conversations.
How the AI uses services [#how-the-ai-uses-services]
Once added, the AI can:
* Recommend the service when a customer describes a problem (e.g., "My brakes are squeaking" → brake pad replacement)
* Provide pricing when customers ask "How much does an oil change cost?"
* Offer to book an appointment for the service
* List available services when customers ask what you offer
Writing effective descriptions [#writing-effective-descriptions]
Good descriptions help the AI give accurate, helpful answers:
| Weak | Strong |
| ------------ | ------------------------------------------------------------------------------------------------------------------------------------ |
| "Oil change" | "Full synthetic oil change including filter replacement, fluid top-off, and multi-point inspection. Takes approximately 30 minutes." |
| "Brakes" | "Front or rear brake pad replacement with rotor inspection. Includes brake fluid check. Most vehicles completed same day." |
The cost field is what the AI quotes to customers. Keep it updated — if pricing changes
seasonally, update the service record so the AI doesn't give outdated quotes.
Tips [#tips]
* Add all services your dealership commonly performs, even simple ones — customers ask about everything.
* Include time estimates in descriptions so the AI can set expectations.
* Use the image field for services with visual components (e.g., detailing before/after).
* Group related services with consistent naming (e.g., "Tire — Rotation", "Tire — Replacement", "Tire — Alignment").
# How to edit or remove a service (/docs/portal/vehicle-services/edit-or-remove-a-service)
As pricing changes or services are added and retired, you'll need to update your service
catalog. Edits take effect immediately — the AI uses the updated information in its next
response.
Edit a service [#edit-a-service]
Go to
**Services**
from the sidebar.
Click the service you want to modify.
Update the
**Name**
,
**Tags**
, or
**Cost**
as needed.
Revise the
**Description**
to reflect any changes in what's included.
Replace or remove the
**Image**
if applicable.
Click
**Save**
to apply your changes.
Remove a service [#remove-a-service]
Go to
**Services**
from the sidebar.
Click the service you want to remove.
Click
**Delete**
(or the remove/trash icon).
Confirm the deletion when prompted.
Once deleted, the AI will no longer reference this service in conversations.
When to edit vs. remove [#when-to-edit-vs-remove]
* **Edit** — when pricing changes, descriptions need updating, or you're rebranding a service
* **Remove** — when the service is permanently discontinued and shouldn't be mentioned at all
Impact on active conversations [#impact-on-active-conversations]
* **Edits**: The AI uses updated details from its next response onward. Active conversations
mid-flow will get the new information.
* **Removal**: The AI stops mentioning the service immediately. If a customer was just told
about the service, the AI will gracefully handle follow-up questions.
If you're temporarily suspending a service (seasonal, supply issues), consider using
[Toggle Bookable Status](/docs/portal/vehicle-services/toggle-bookable-status) instead of
deleting — this keeps the service visible but prevents appointment booking.
Tips [#tips]
* Update prices at least quarterly to ensure the AI quotes accurately.
* When renaming a service, update the description too — customers may know it by the old name.
* Before deleting a service, check if any active Reach sequences reference it.
# Services (/docs/portal/vehicle-services)
The **Services** section manages the dealership service catalog used by DealerAI.
Services list [#services-list]
The current Services page shows:
* A service count in the header
* A **Train AI** action
* An **Add** action
* A list of existing services
This is the main place for maintaining service offerings that should be available to the AI.
Service edit view [#service-edit-view]
When creating or editing a service, the current form includes fields such as:
* **Name**
* **Tags**
* **Description**
* **Cost**
* A **Bookable** option
* **Cancel** and **Save** actions
Train AI [#train-ai]
Use **Train AI** after updating service content so the latest service details are reflected in live AI responses.
This matters whenever the dealership adds, renames, reprices, or changes how a service should be presented.
Typical workflow [#typical-workflow]
Open
**Services**
from the navigation.
Review the current service list.
Click
**Add**
to create a new service or open an existing one to edit it.
Update the service details and save the record.
Use
**Train AI**
when the changes should affect live customer conversations.
Notes [#notes]
* The portal route for this section is `/services`.
* The docs navigation slug remains `vehicle-services`, but the UI label shown in the portal is **Services**.
* Services documentation pairs well with **Knowledge Base** and **Appointments** when documenting service-department workflows.
# How to toggle bookable status (/docs/portal/vehicle-services/toggle-bookable-status)
The bookable status controls whether the AI can schedule appointments for a service.
When enabled, customers can book directly through the chat. When disabled, the AI can
still mention the service but will direct customers to call for scheduling.
Enable booking for a service [#enable-booking-for-a-service]
Go to
**Services**
from the sidebar.
Click the service you want to make bookable.
Find the
**Bookable**
toggle.
Switch it to
**On**
.
Click
**Save**
.
The AI can now offer to book this service when a customer expresses interest.
Disable booking for a service [#disable-booking-for-a-service]
Open the service from the list.
Switch the
**Bookable**
toggle to
**Off**
.
Click
**Save**
.
The AI will still mention the service and provide pricing, but instead of offering to book,
it will direct the customer to call the dealership.
When to disable booking [#when-to-disable-booking]
* **Limited capacity** — you're fully booked and can't take online appointments
* **Complex services** — the service requires an in-person assessment before scheduling
(e.g., body work, custom modifications)
* **Seasonal availability** — the service is only offered during certain months
* **Equipment downtime** — temporarily unable to perform the service
How the AI handles non-bookable services [#how-the-ai-handles-non-bookable-services]
When a customer asks to book a non-bookable service, the AI:
1. Confirms the service is available
2. Provides pricing and description
3. Asks the customer to call the dealership to schedule
4. Offers the dealership's phone number
Toggling bookable status is non-destructive — the service remains visible and the AI
still knows about it. Only the appointment booking capability is affected.
Tips [#tips]
* Use this toggle instead of deleting services that are temporarily unavailable.
* Keep popular, straightforward services bookable (oil changes, tire rotations) to maximize
online conversions.
* Disable booking for services that require diagnosis — let staff assess and schedule manually.
* Review your bookable services monthly and adjust based on shop capacity.
# Get Conversations with Filtering and Pagination (/docs/api/api/v1/conversation/get)
{/* This file was generated by Fumadocs. Do not edit this file directly. Any changes should be made by running the generation command again. */}
# Get Dealership (/docs/api/api/v1/dealership/get)
{/* This file was generated by Fumadocs. Do not edit this file directly. Any changes should be made by running the generation command again. */}
# Get Manufacturers (/docs/api/api/v1/manufacturer/get)
{/* This file was generated by Fumadocs. Do not edit this file directly. Any changes should be made by running the generation command again. */}
# Search Cars (/docs/api/api/v1/search/post)
{/* This file was generated by Fumadocs. Do not edit this file directly. Any changes should be made by running the generation command again. */}
# Add or Update Contact (/docs/api/api/v1/ailm/contact/post)
{/* This file was generated by Fumadocs. Do not edit this file directly. Any changes should be made by running the generation command again. */}
# Engage Contact (/docs/api/api/v1/ailm/engage/post)
{/* This file was generated by Fumadocs. Do not edit this file directly. Any changes should be made by running the generation command again. */}
# List predefined assistant tasks (/docs/api/api/v1/assistant/predefined-tasks/get)
{/* This file was generated by Fumadocs. Do not edit this file directly. Any changes should be made by running the generation command again. */}
# List assistant threads (/docs/api/api/v1/assistant/threads/get)
{/* This file was generated by Fumadocs. Do not edit this file directly. Any changes should be made by running the generation command again. */}
# List appointments (/docs/api/api/v1/assistant-data/appointments/get)
{/* This file was generated by Fumadocs. Do not edit this file directly. Any changes should be made by running the generation command again. */}
# List conversations (/docs/api/api/v1/assistant-data/conversations/get)
{/* This file was generated by Fumadocs. Do not edit this file directly. Any changes should be made by running the generation command again. */}
# List leads (/docs/api/api/v1/assistant-data/leads/get)
{/* This file was generated by Fumadocs. Do not edit this file directly. Any changes should be made by running the generation command again. */}
# Verify Authentication (/docs/api/api/v1/authentication/verify/post)
{/* This file was generated by Fumadocs. Do not edit this file directly. Any changes should be made by running the generation command again. */}
# Get chats for the authenticated dealer. (/docs/api/api/v1/chats/chats/get)
{/* This file was generated by Fumadocs. Do not edit this file directly. Any changes should be made by running the generation command again. */}
# Get Conversation by ConversationId (/docs/api/api/v1/conversation/conversationid/get)
{/* This file was generated by Fumadocs. Do not edit this file directly. Any changes should be made by running the generation command again. */}
# Delete All New Cars (/docs/api/api/v1/inventory/new/delete)
{/* This file was generated by Fumadocs. Do not edit this file directly. Any changes should be made by running the generation command again. */}
# Get New Cars (/docs/api/api/v1/inventory/new/get)
{/* This file was generated by Fumadocs. Do not edit this file directly. Any changes should be made by running the generation command again. */}
# Upload New Inventory CSV (/docs/api/api/v1/inventory/new/put)
{/* This file was generated by Fumadocs. Do not edit this file directly. Any changes should be made by running the generation command again. */}
# Delete All Used Cars (/docs/api/api/v1/inventory/used/delete)
{/* This file was generated by Fumadocs. Do not edit this file directly. Any changes should be made by running the generation command again. */}
# Get Used Cars (/docs/api/api/v1/inventory/used/get)
{/* This file was generated by Fumadocs. Do not edit this file directly. Any changes should be made by running the generation command again. */}
# Upload Used Inventory CSV (/docs/api/api/v1/inventory/used/put)
{/* This file was generated by Fumadocs. Do not edit this file directly. Any changes should be made by running the generation command again. */}
# Translate Search Query (/docs/api/api/v1/search/translate/post)
{/* This file was generated by Fumadocs. Do not edit this file directly. Any changes should be made by running the generation command again. */}
# Process ADF Lead (/docs/api/api/v1/ailm/outbound/adf/post)
{/* This file was generated by Fumadocs. Do not edit this file directly. Any changes should be made by running the generation command again. */}
# Get assistant capabilities (/docs/api/api/v1/assistant/threads/capabilities/get)
{/* This file was generated by Fumadocs. Do not edit this file directly. Any changes should be made by running the generation command again. */}
# Send a message to the assistant (/docs/api/api/v1/assistant/threads/message/post)
{/* This file was generated by Fumadocs. Do not edit this file directly. Any changes should be made by running the generation command again. */}
# Delete an assistant thread (/docs/api/api/v1/assistant/threads/threadid/delete)
{/* This file was generated by Fumadocs. Do not edit this file directly. Any changes should be made by running the generation command again. */}
# Get an assistant thread (/docs/api/api/v1/assistant/threads/threadid/get)
{/* This file was generated by Fumadocs. Do not edit this file directly. Any changes should be made by running the generation command again. */}
# Get a single chat conversation by id. (/docs/api/api/v1/chats/chats/conversationid/get)
{/* This file was generated by Fumadocs. Do not edit this file directly. Any changes should be made by running the generation command again. */}
# Upload New Inventory JSON (/docs/api/api/v1/inventory/new/json/put)
{/* This file was generated by Fumadocs. Do not edit this file directly. Any changes should be made by running the generation command again. */}
# Delete New Car by VIN (/docs/api/api/v1/inventory/new/vin/delete)
{/* This file was generated by Fumadocs. Do not edit this file directly. Any changes should be made by running the generation command again. */}
# Get New Car by VIN (/docs/api/api/v1/inventory/new/vin/get)
{/* This file was generated by Fumadocs. Do not edit this file directly. Any changes should be made by running the generation command again. */}
# Upload Used Inventory JSON (/docs/api/api/v1/inventory/used/json/put)
{/* This file was generated by Fumadocs. Do not edit this file directly. Any changes should be made by running the generation command again. */}
# Delete Used Car by VIN (/docs/api/api/v1/inventory/used/vin/delete)
{/* This file was generated by Fumadocs. Do not edit this file directly. Any changes should be made by running the generation command again. */}
# Get Used Car by VIN (/docs/api/api/v1/inventory/used/vin/get)
{/* This file was generated by Fumadocs. Do not edit this file directly. Any changes should be made by running the generation command again. */}
# Get Models by Manufacturer (/docs/api/api/v1/manufacturer/manufacturerid/models/get)
{/* This file was generated by Fumadocs. Do not edit this file directly. Any changes should be made by running the generation command again. */}
# Notifies DealerAI that a retailer has enabled the CreditApp integration. (/docs/api/api/v1/webhooks/creditapp/integration-enabled/post)
{/* This file was generated by Fumadocs. Do not edit this file directly. Any changes should be made by running the generation command again. */}
# Execute a predefined assistant task (/docs/api/api/v1/assistant/predefined-tasks/taskkey/execute/post)
{/* This file was generated by Fumadocs. Do not edit this file directly. Any changes should be made by running the generation command again. */}
# Cancel a thread run (/docs/api/api/v1/assistant/threads/threadid/cancel/post)
{/* This file was generated by Fumadocs. Do not edit this file directly. Any changes should be made by running the generation command again. */}
# List messages in a thread (/docs/api/api/v1/assistant/threads/threadid/messages/get)
{/* This file was generated by Fumadocs. Do not edit this file directly. Any changes should be made by running the generation command again. */}
# Get a run (/docs/api/api/v1/assistant/threads/threadid/runs/runid/get)
{/* This file was generated by Fumadocs. Do not edit this file directly. Any changes should be made by running the generation command again. */}
# Stream run events (/docs/api/api/v1/assistant/threads/threadid/runs/runid/events/get)
{/* This file was generated by Fumadocs. Do not edit this file directly. Any changes should be made by running the generation command again. */}
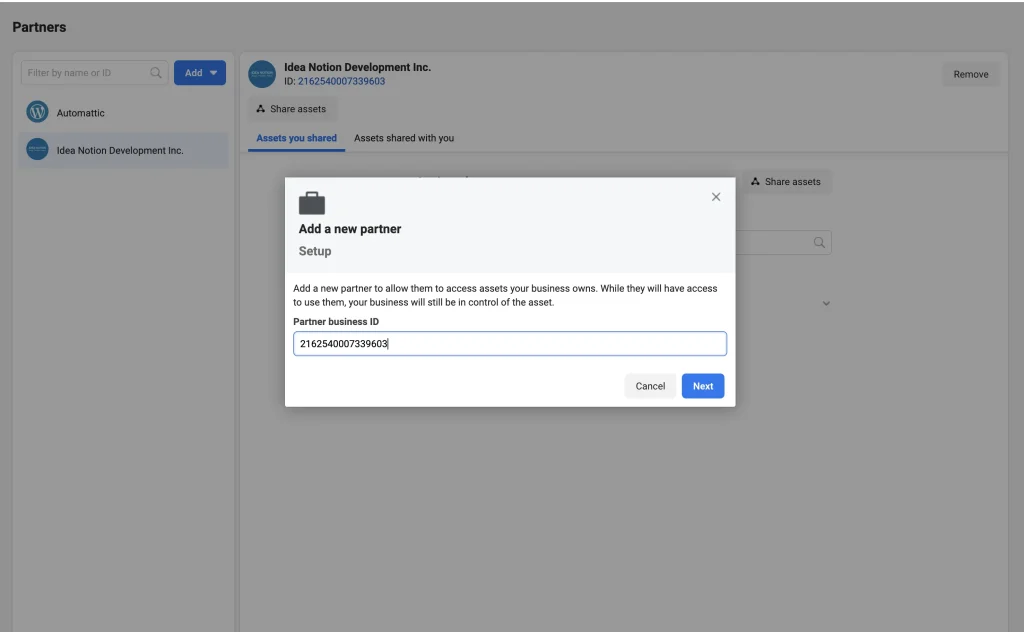 Grant Partial Access to your Page [#grant-partial-access-to-your-page]